"InvernaLink" An open source garden monitoring system powered by Home Assistant

Author: Javier Bateman Aramendia

Created on: November 19, 2024 at 13:21

Project Status: Project Completed!

Project Goals

How does this improve my greenhouse?


Running my greenhouse 30 minutes from home means automation is essential. I can’t always be there to manually open windows, adjust heating, or water plants. At first I tried using an amazon echo  with smart switches, but I found it lacking. While they’re fine for simple tasks like turning lights on and off and setting timers, I needed a more data-driven solution—and I wasn’t comfortable with Amazon having access to my data and hardware.

Developing my own automation system seemed overwhelming at first. It meant creating desktop and mobile apps, learning to control IoT devices across different platforms, and tying everything together with my own hardware...

Enter HomeAssistant.

Home assistant is an open source OIT software that is constantly being updated. You host it, meaning there are no companies harvesting your data, and best of all its FREE. we will be using HomeAssistant as the brain and structural bones of our design, however in the nature of contributing to openSource projects, we will be adding some homemade unique hardware to act as the muscles of this operation.  


How It All Comes Together


  • Software:
    • HomeAssistant: This is our bread and butter. Through home assist you can link all your IOT devices, track data from the InvernaLink as well as any other sensors you might have, and then dictate actions based on your available data. 
    • InvernaLink Logic: In order for you to seamlessly enjoy the utility of the InvernaLink we will need to write code that allows us to interact with the physical hardware and the data harvested from it on HomeAssistant instead of building new apps from scratch. This will help us keep everything on ONE platform. 
  • Hardware
    • The Hub: A raspberry pi (in our case, though you could use any other computer) that hosts the HomeAssistant and acts as a controller for everything happening on the farm
    • InvernaLink: A custom piece of hardware I will be manufacturing that makes it easy to collect data on...
      • air temperature
      • relative humidity
      • absolute humidity
      • VPD
      • Dew Point
      • Atmospheric CO2 
      • Light intensity
      • pH
      • EC
      • TDS
      • water temp
    • Anything we use controlled by HomeAssistant: 
      • for example: 
        • Wifi controlled pellet heaters to heat your greenhouse 
        • wifi controlled plugs to turn simple appliances on and off
        • security cameras
        • smart water pumps 
        • Nutrient dosing peristalting pumps 
        • supplemental lighting 
        • Ventilation (adjusted automatically depending on exterior and interior temperatures and CO2 readings)
        • CO2 injection with smart valves


So what exactly does the InvernaLink do?


The InvernaLink is simply a sensor kit that easily links up to HomeAssistant. The benefit here is we can finally start assigning actions in response to our data in a super intuitive way. It is essentially capable of saying "IF X parameter -> THEN Y response action". 

Let's look at some practical applications through a winter scenario. It is the middle of December, exterior temperatures are 0 degrees Celsius (32 degrees f). The InvernaLinksensor reads a low LUX (light), low air temperature and low water temperature. Without missing a beat, the data is read by your HomeAssistant and kicks on a water heater to prevent root rot, a wifi controlled pellet heater to keep the air temperature up, and some supplemental LED lights to extend the "daylight" hours for your plants. Once the parameters are back to normal, the devices shut off, or in the case of an abnormal event, alerts can be sent directly to the users phone. 

In reality your applications can be as complex or as simple as you need. From a hobbyist growing in less than a square meter, to commercial scale growers who need to automate jobs to reduce labor costs. 


Can I get a InvernaLink?


If all goes well, yes! So far all indications are pointing towards being able to sell the InvernaLink for around 250-350 euros. This is cheaper than most competing sensor kits, and it is the opinion of this humble tinkerer that you're getting far more value in return. If there is demand for it, we can also develop an accompanying nutrient dosing kit and Hub to host HomeAssistant.

Here is a blog post outlining some future InvernaLink accessories we would like to produce in the near future to expand the utility of our devices. 

Do I need to be an expert to use this?


Absolutely not. For users more interested in having something "plug and play" this is a very manageable kit. However for users more interested in tinkering, modifying, and personalizing, you're also in luck! The InvernaLink is DESIGNED to be easily pulled apart, reprogramed, and have its sensors switched out. 


Project Videos

InvernaLink Installation EN

Project Updates


Bring out the champagne!

June 11, 2025 at 02:52
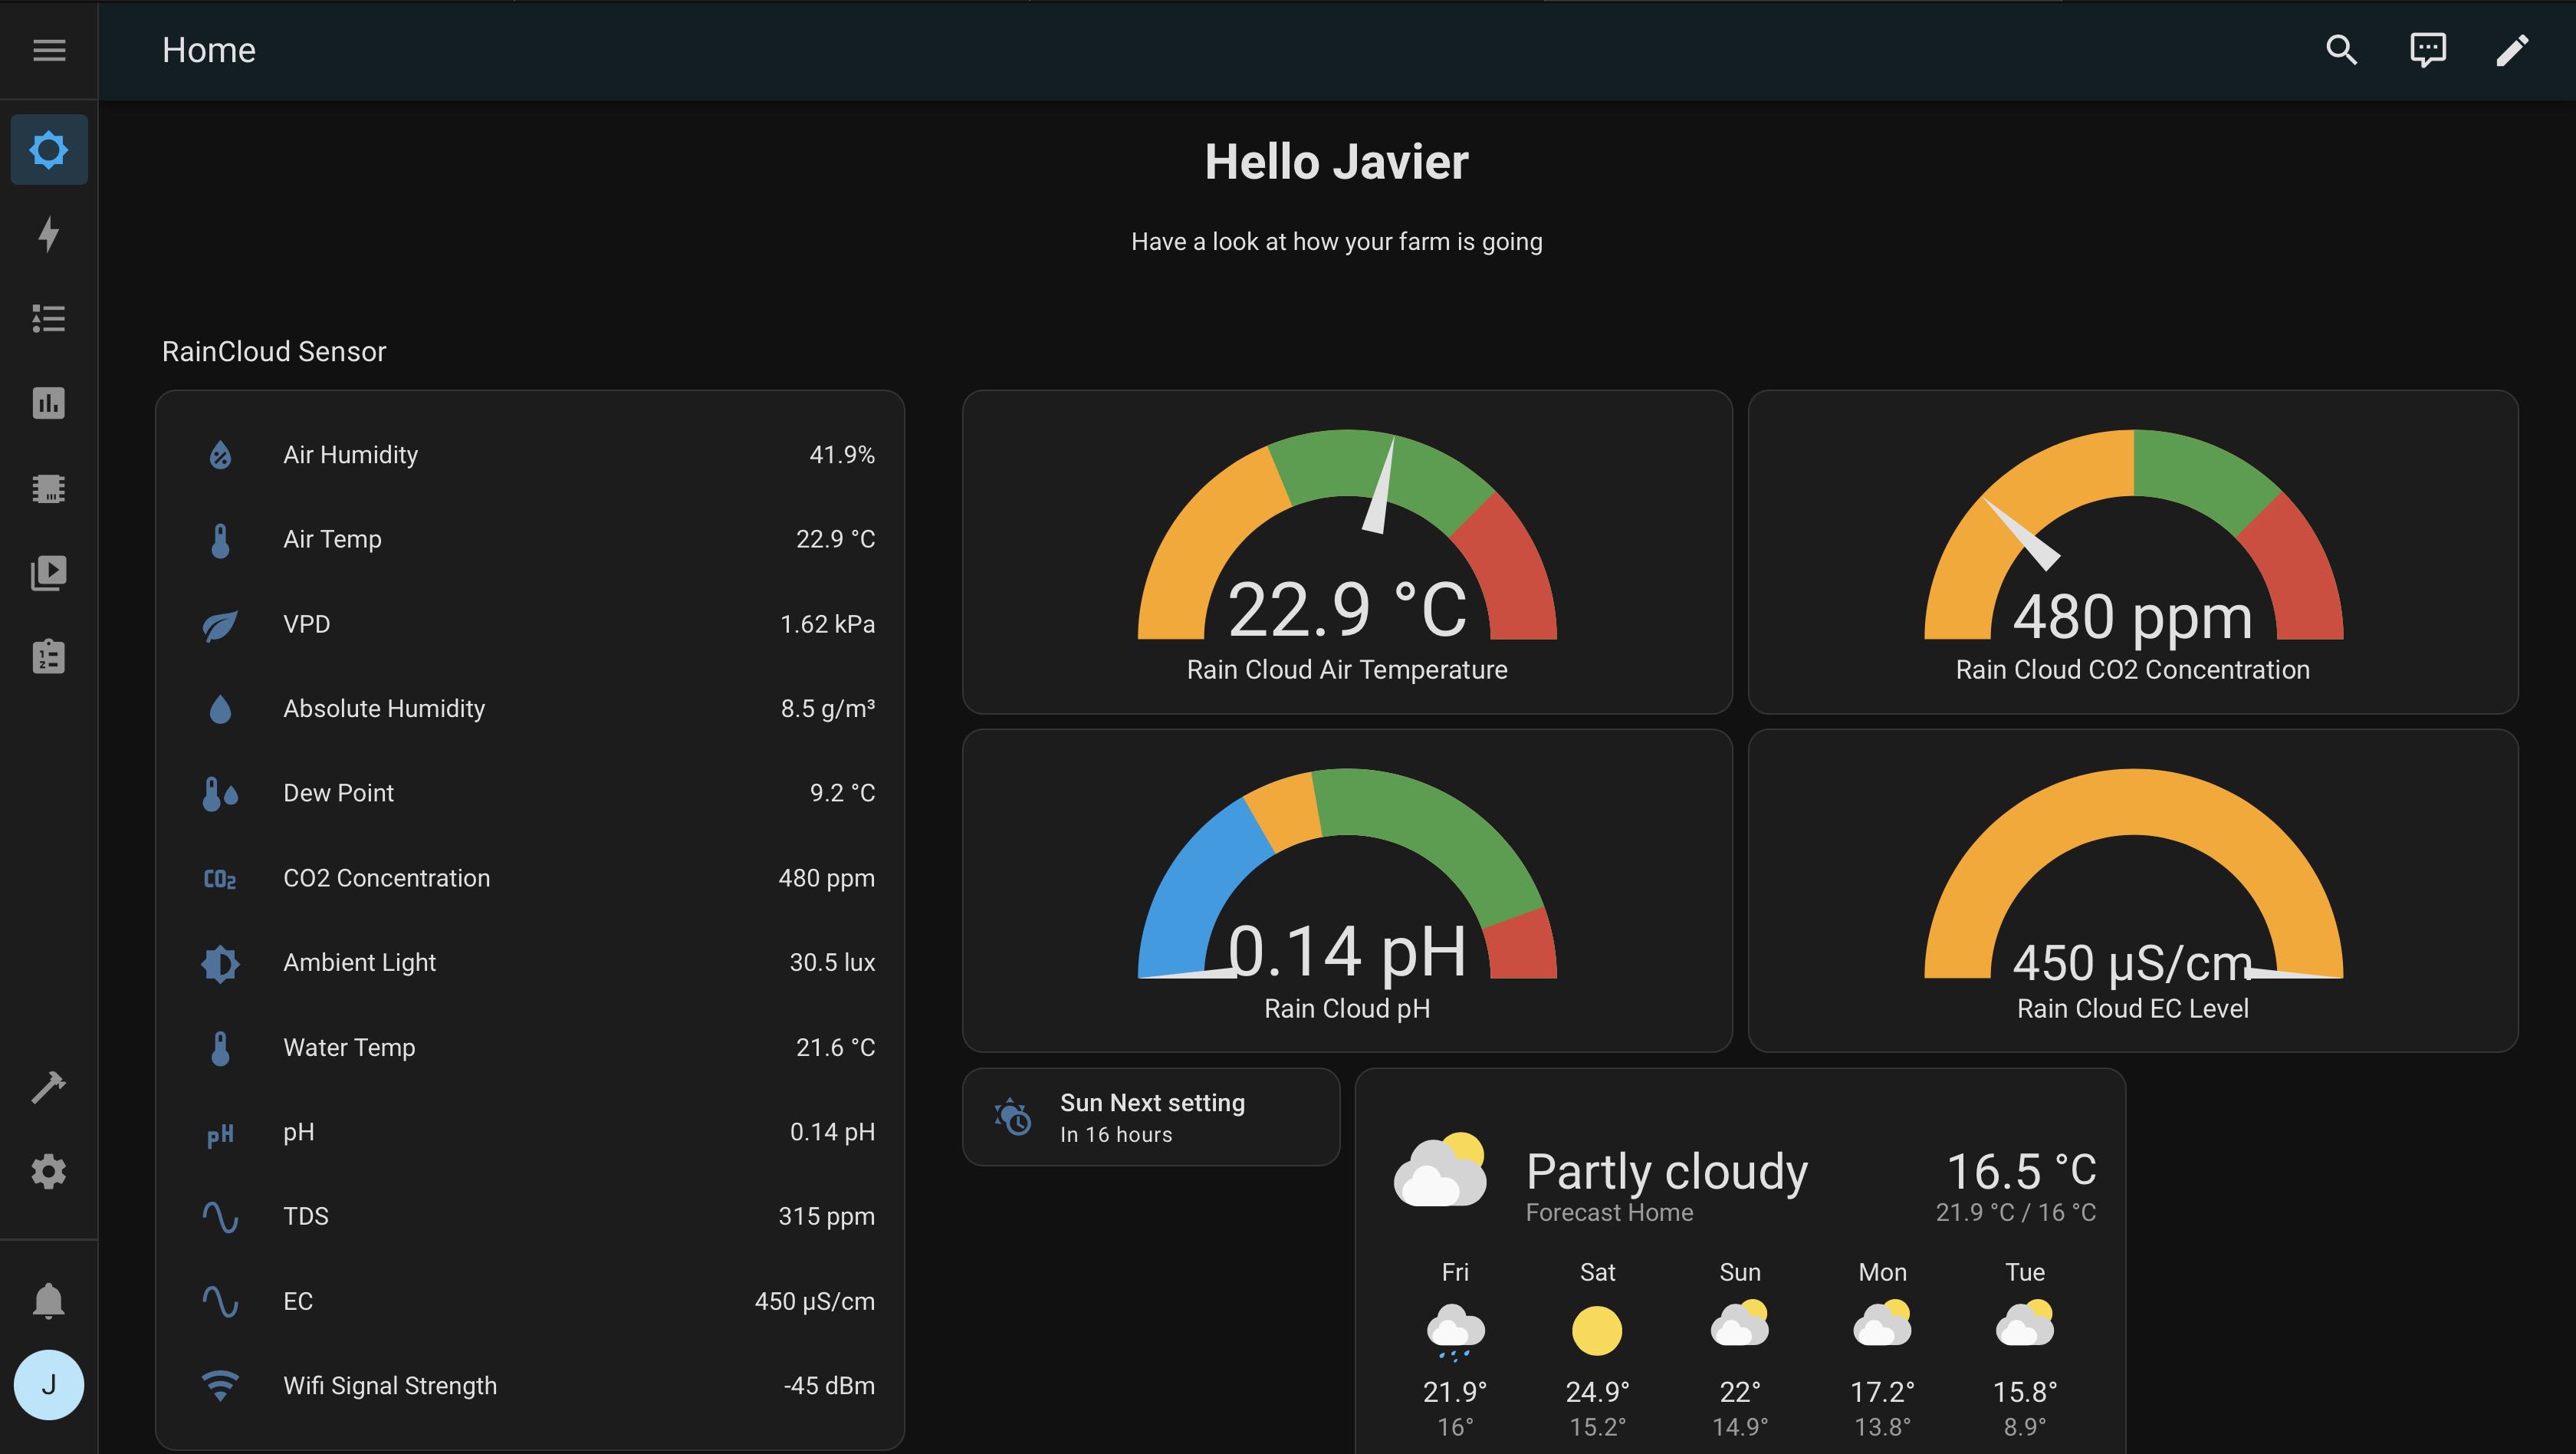
I did it! I've officially completed all the legal paperwork—I'm now registered as an Autónomo in Spain for the first time. This time next week, my product will be available in stores and selling worldwide through this website!

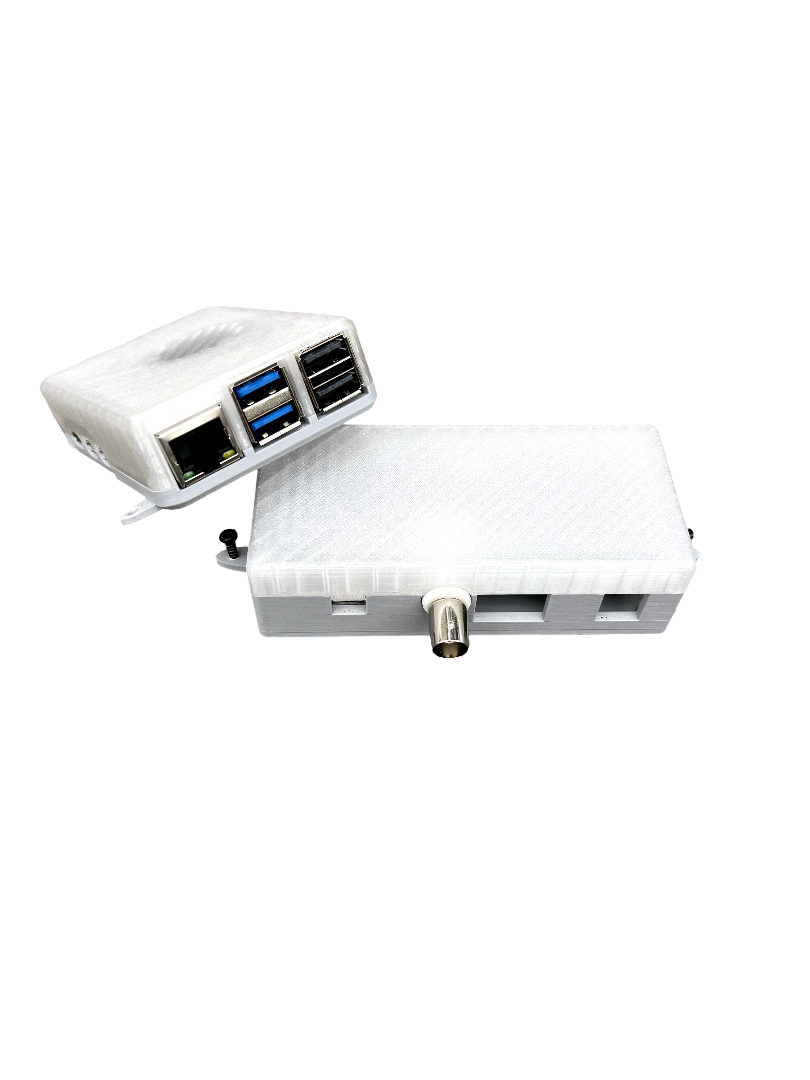
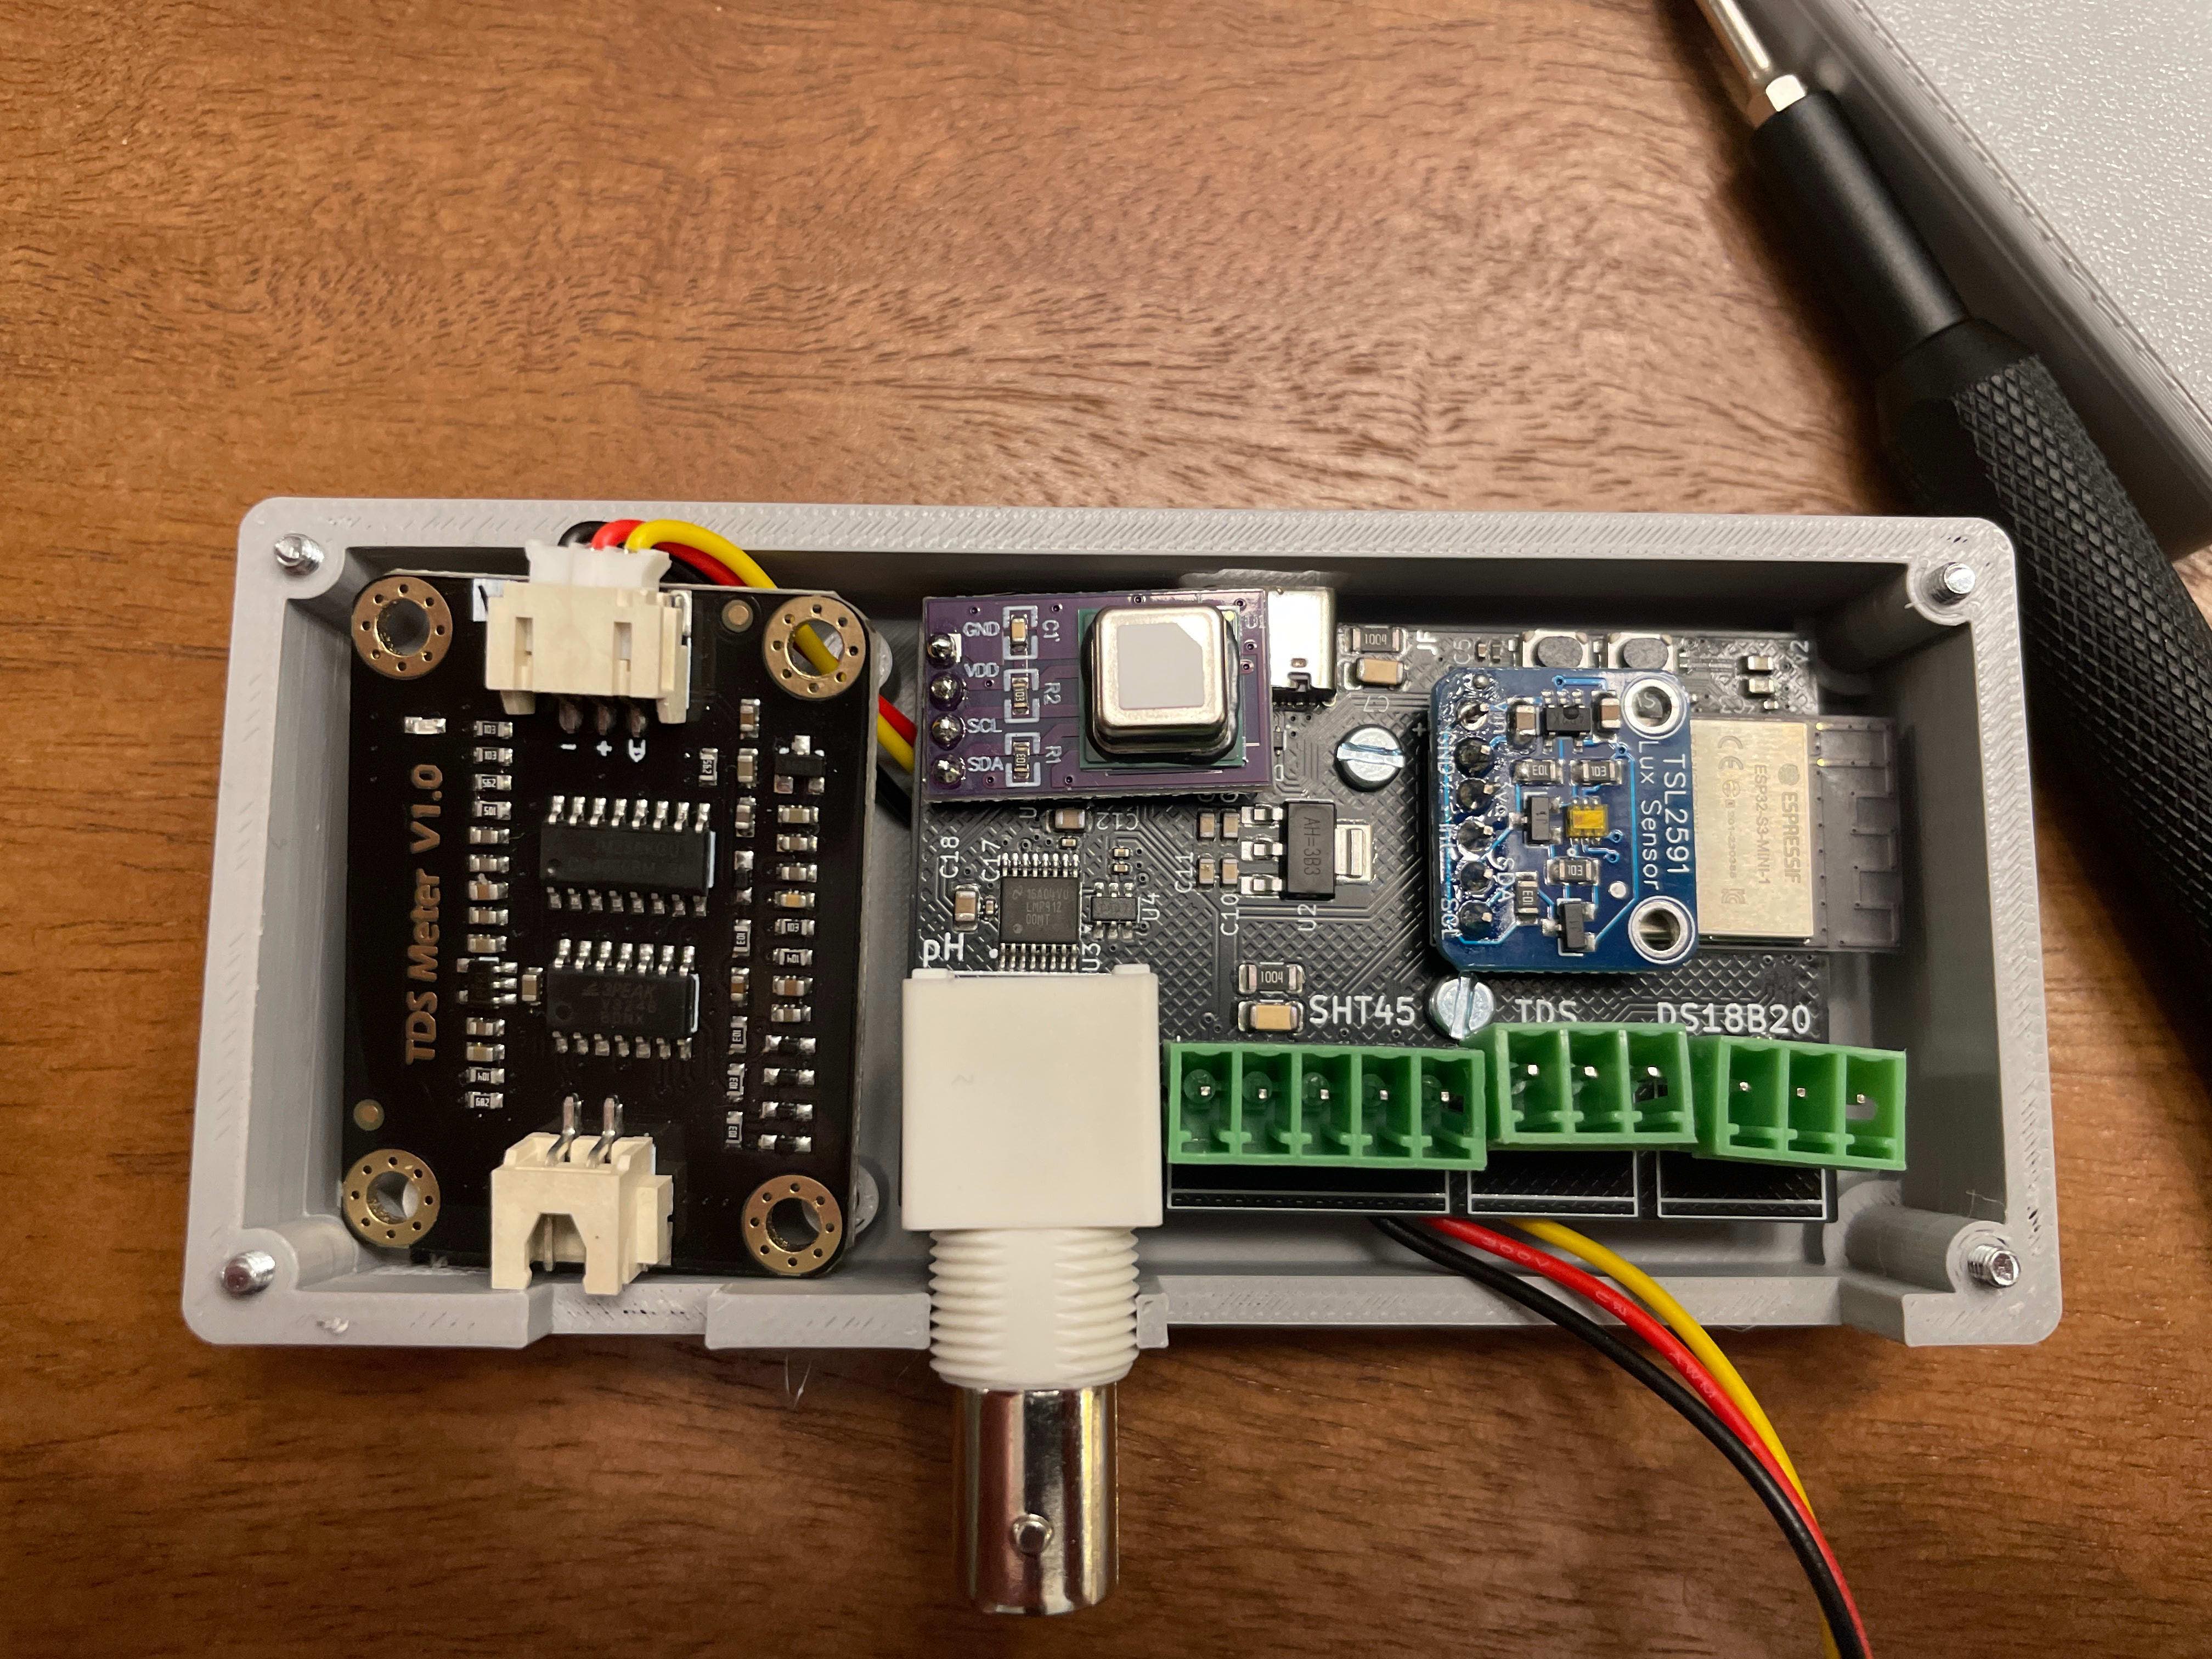
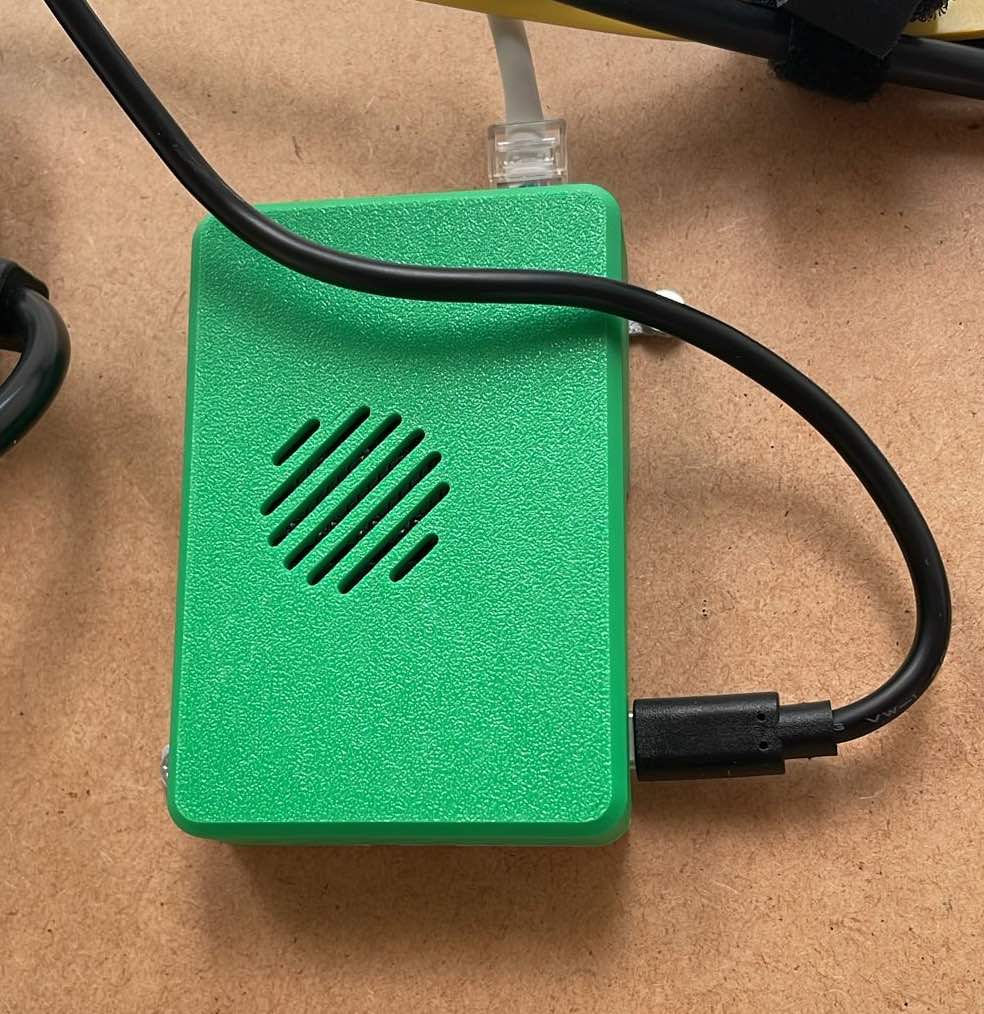
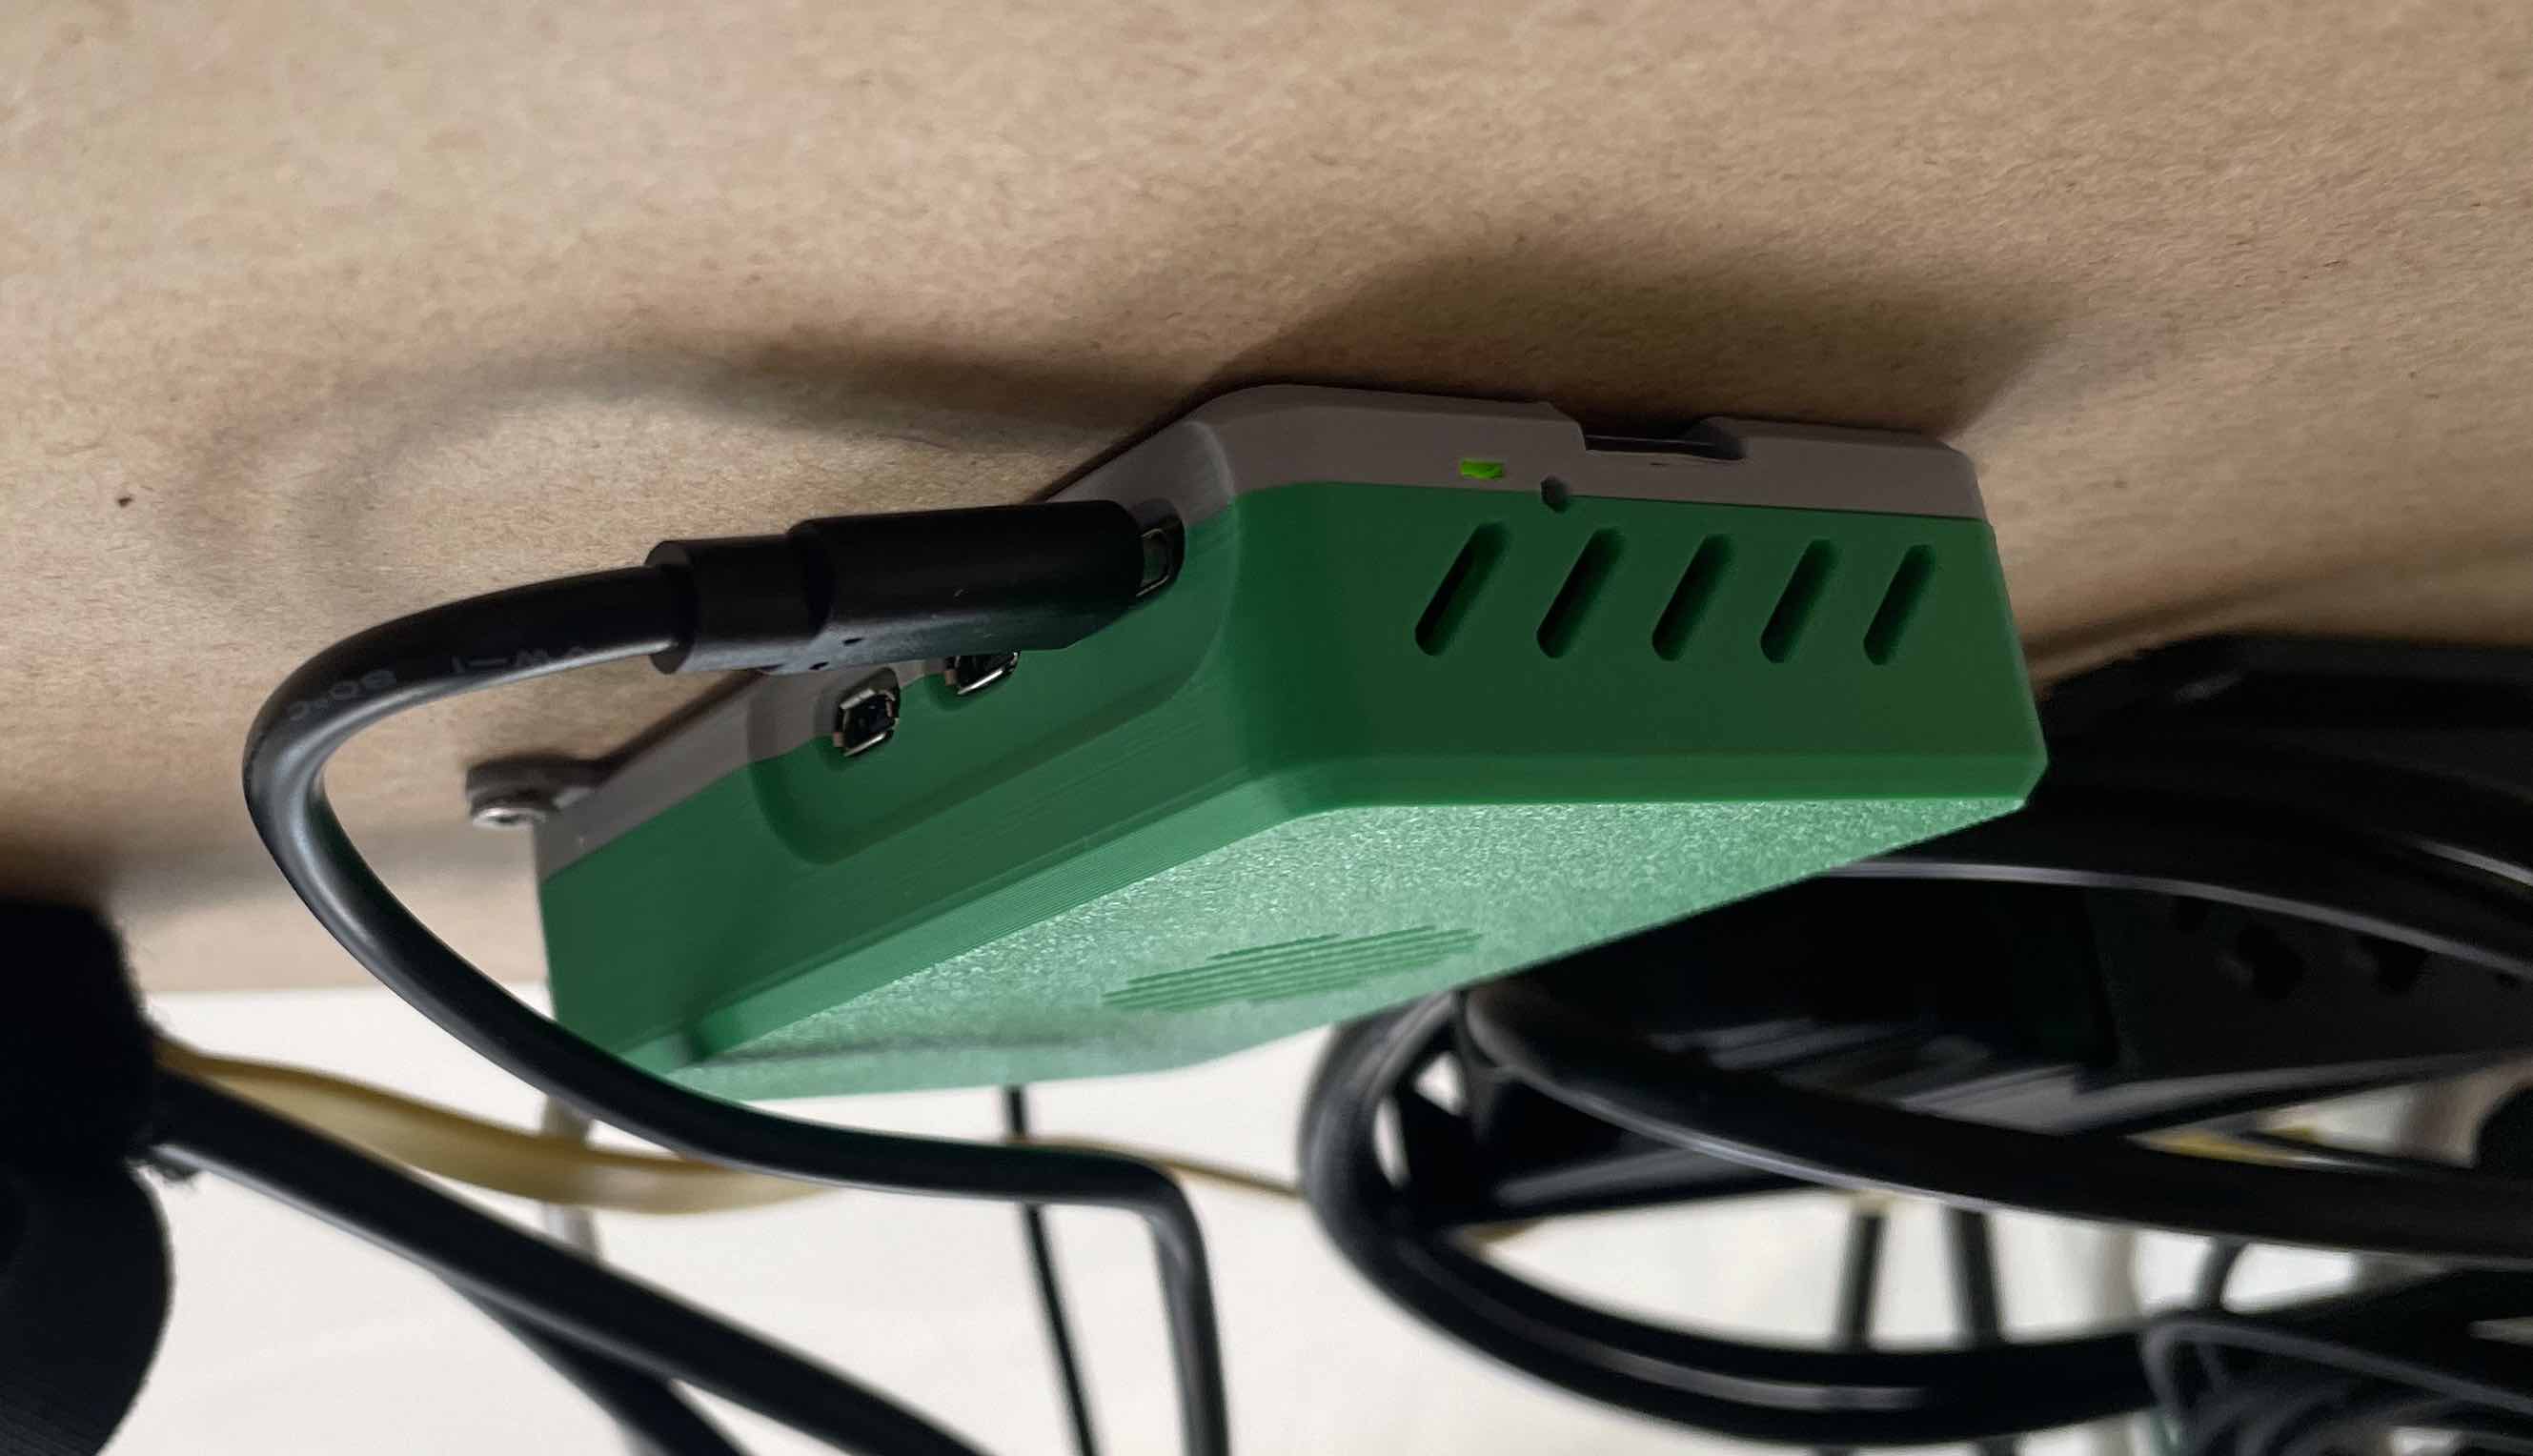
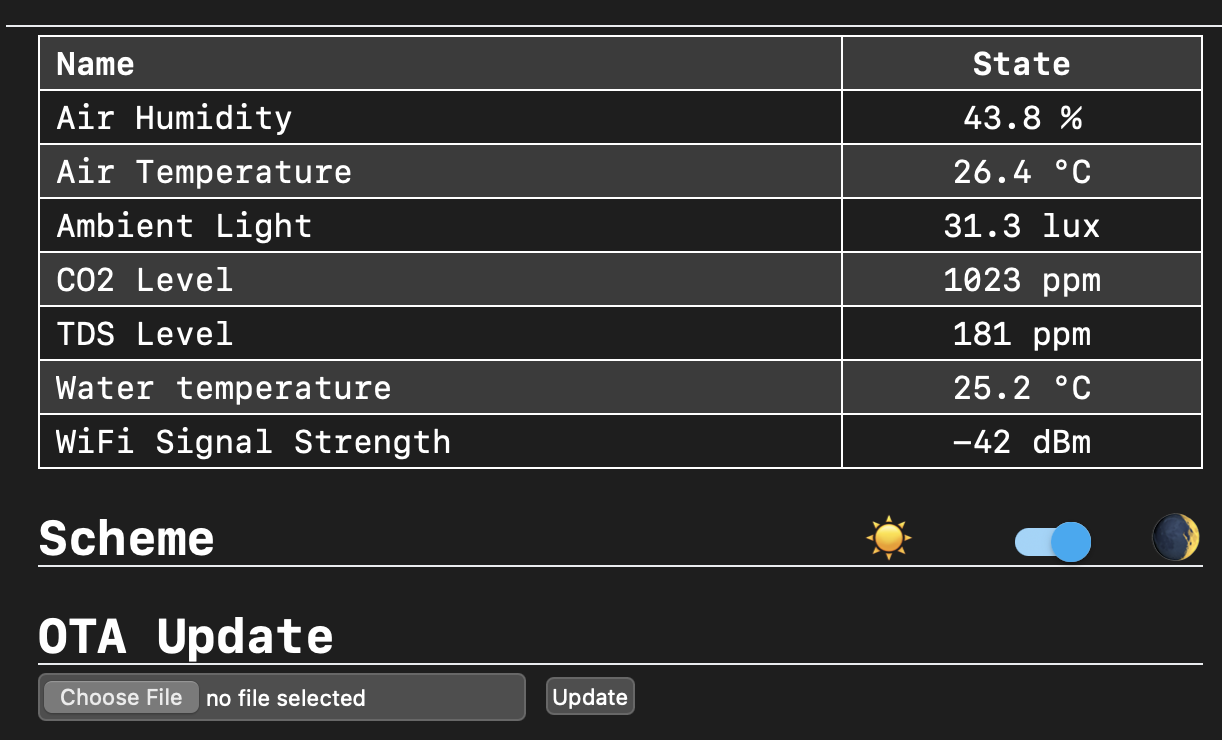
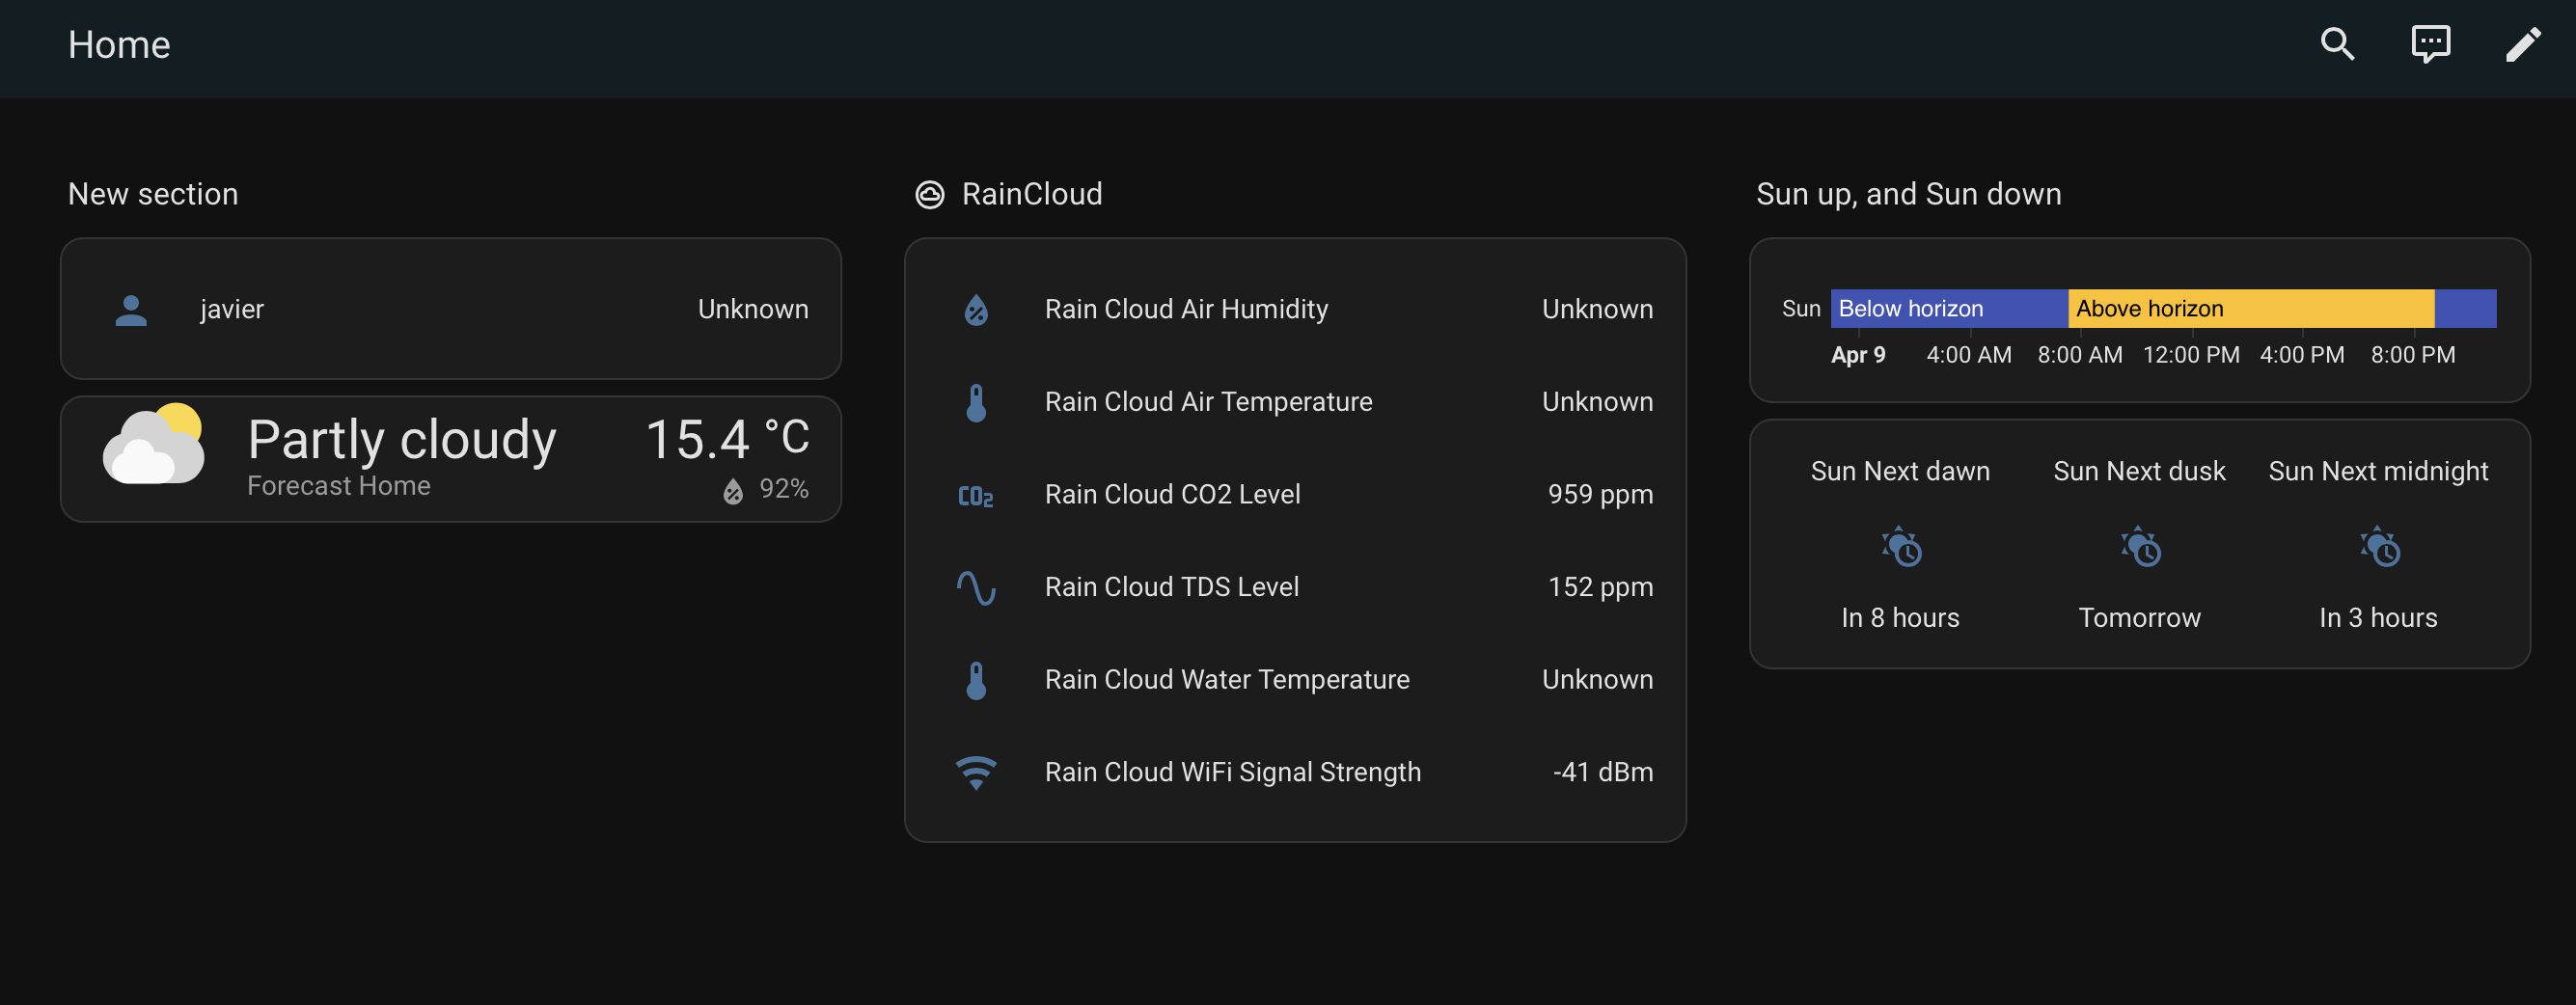
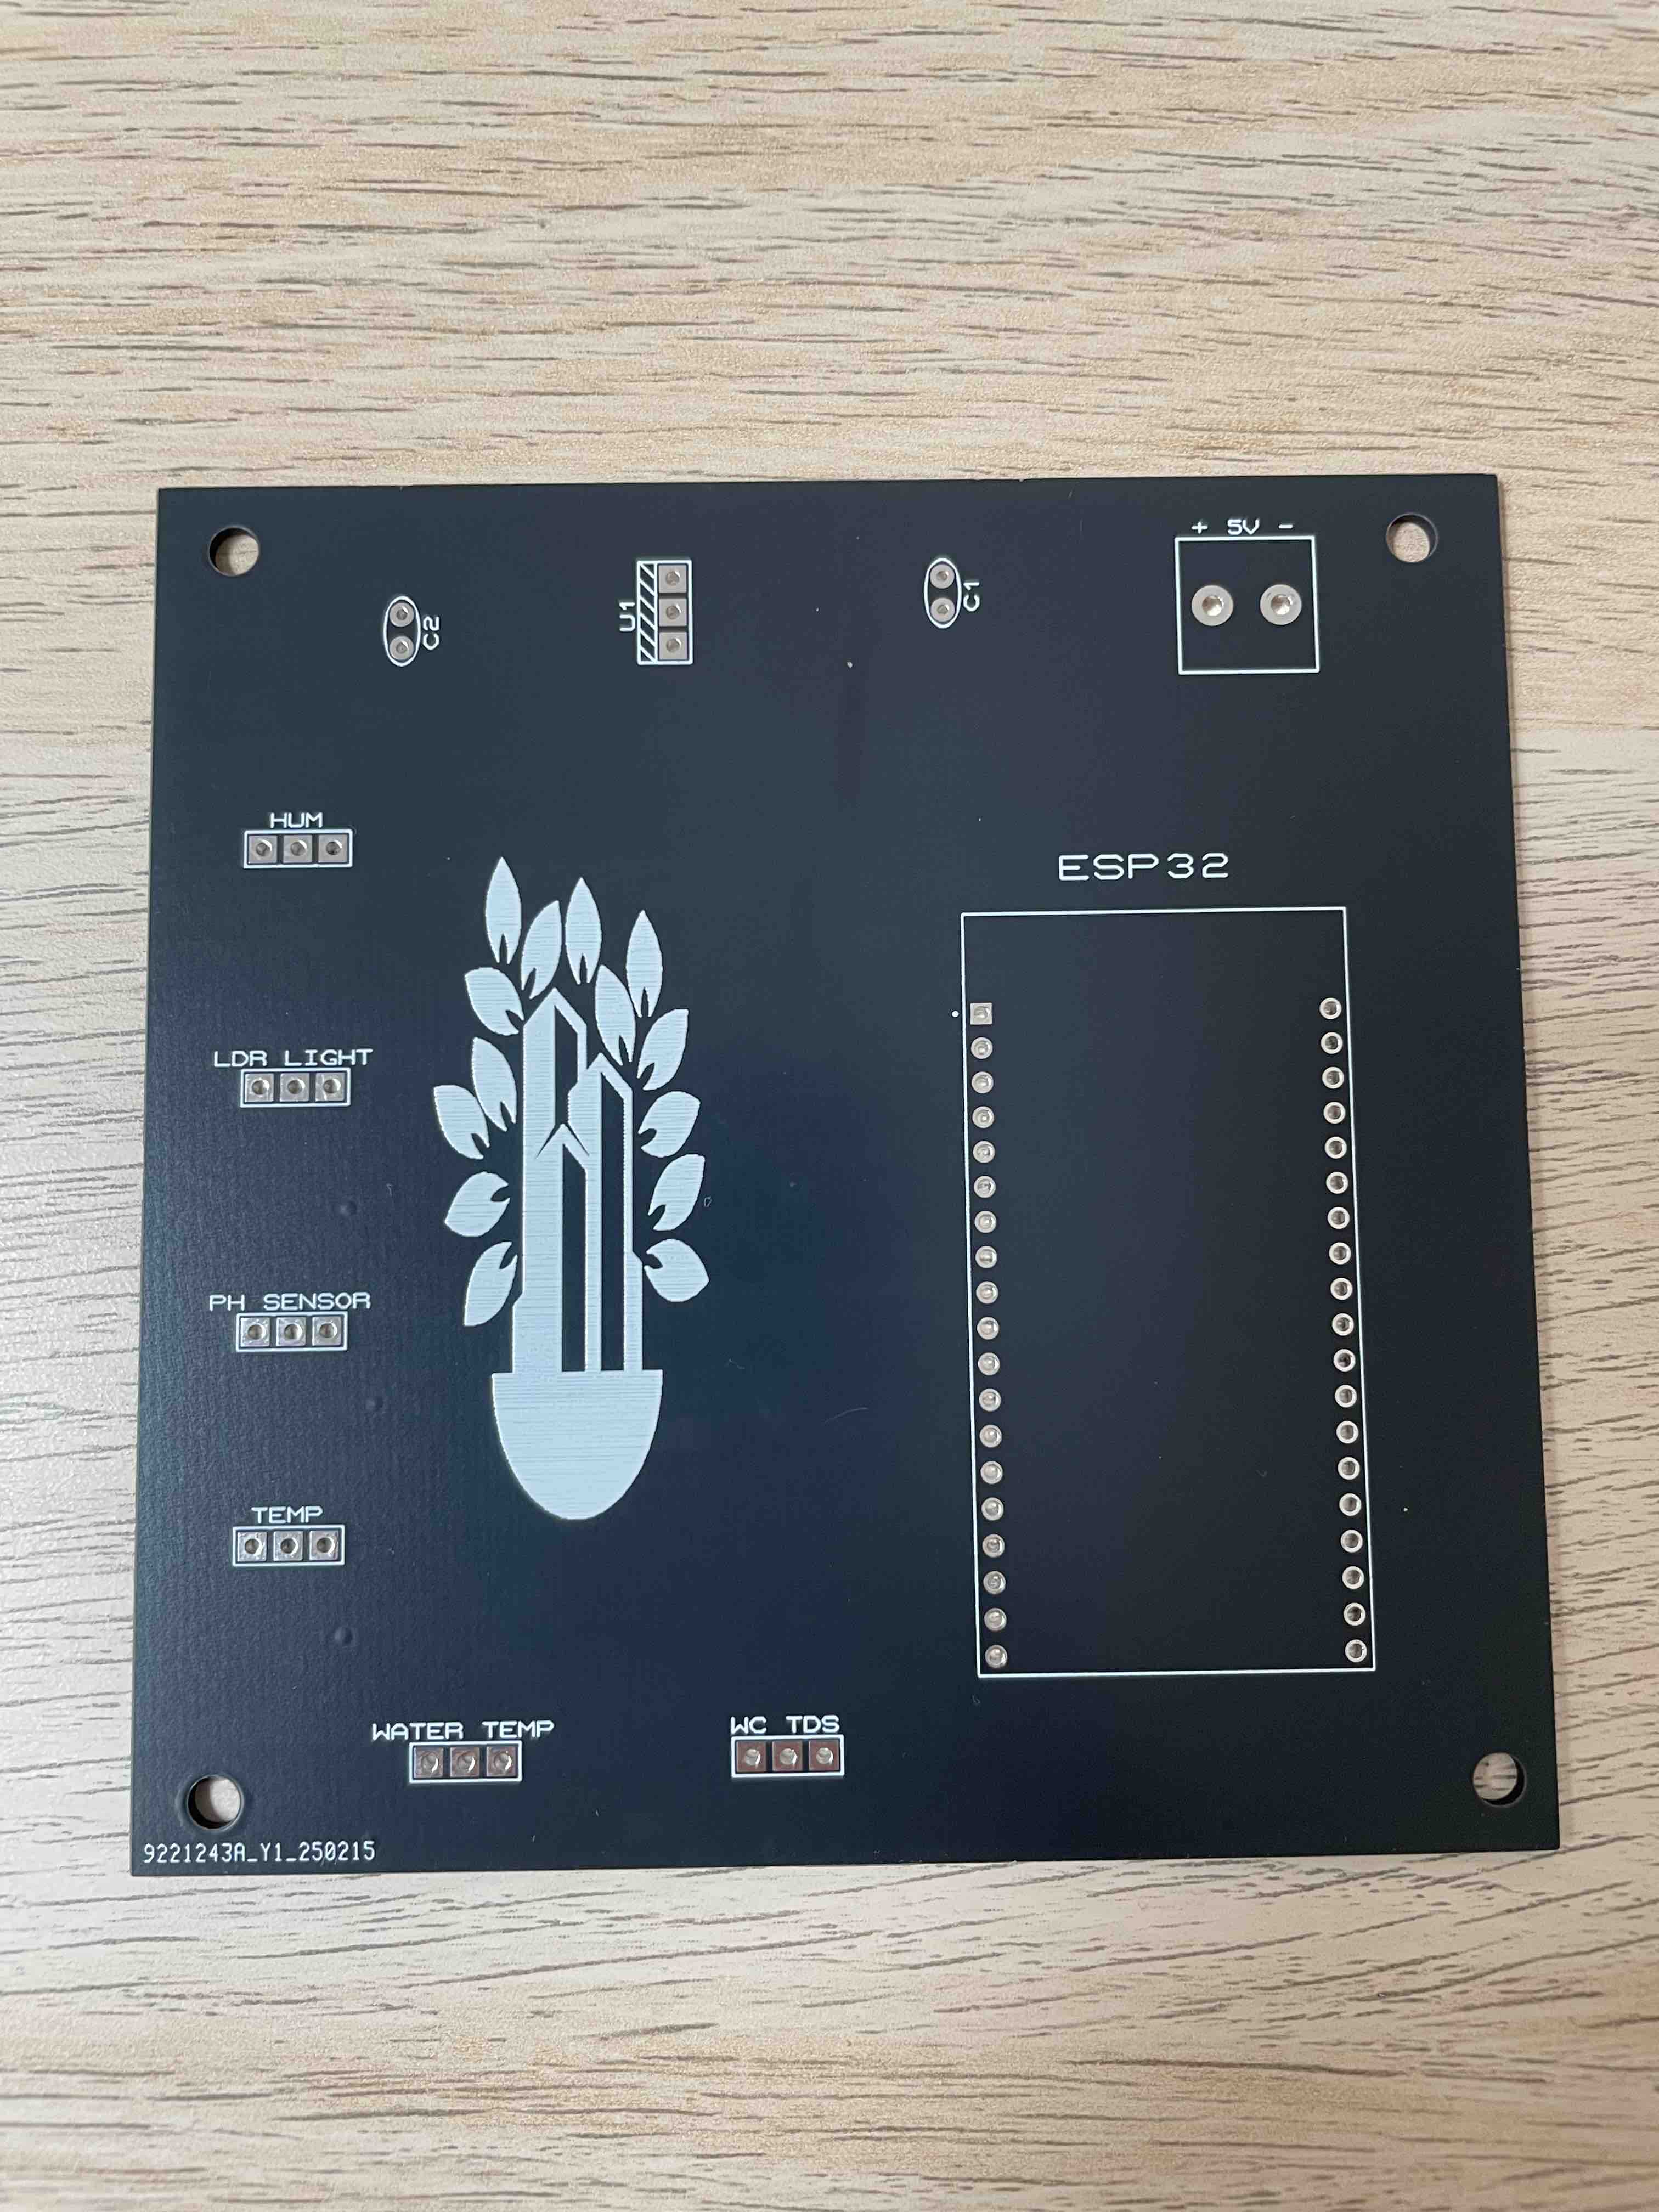
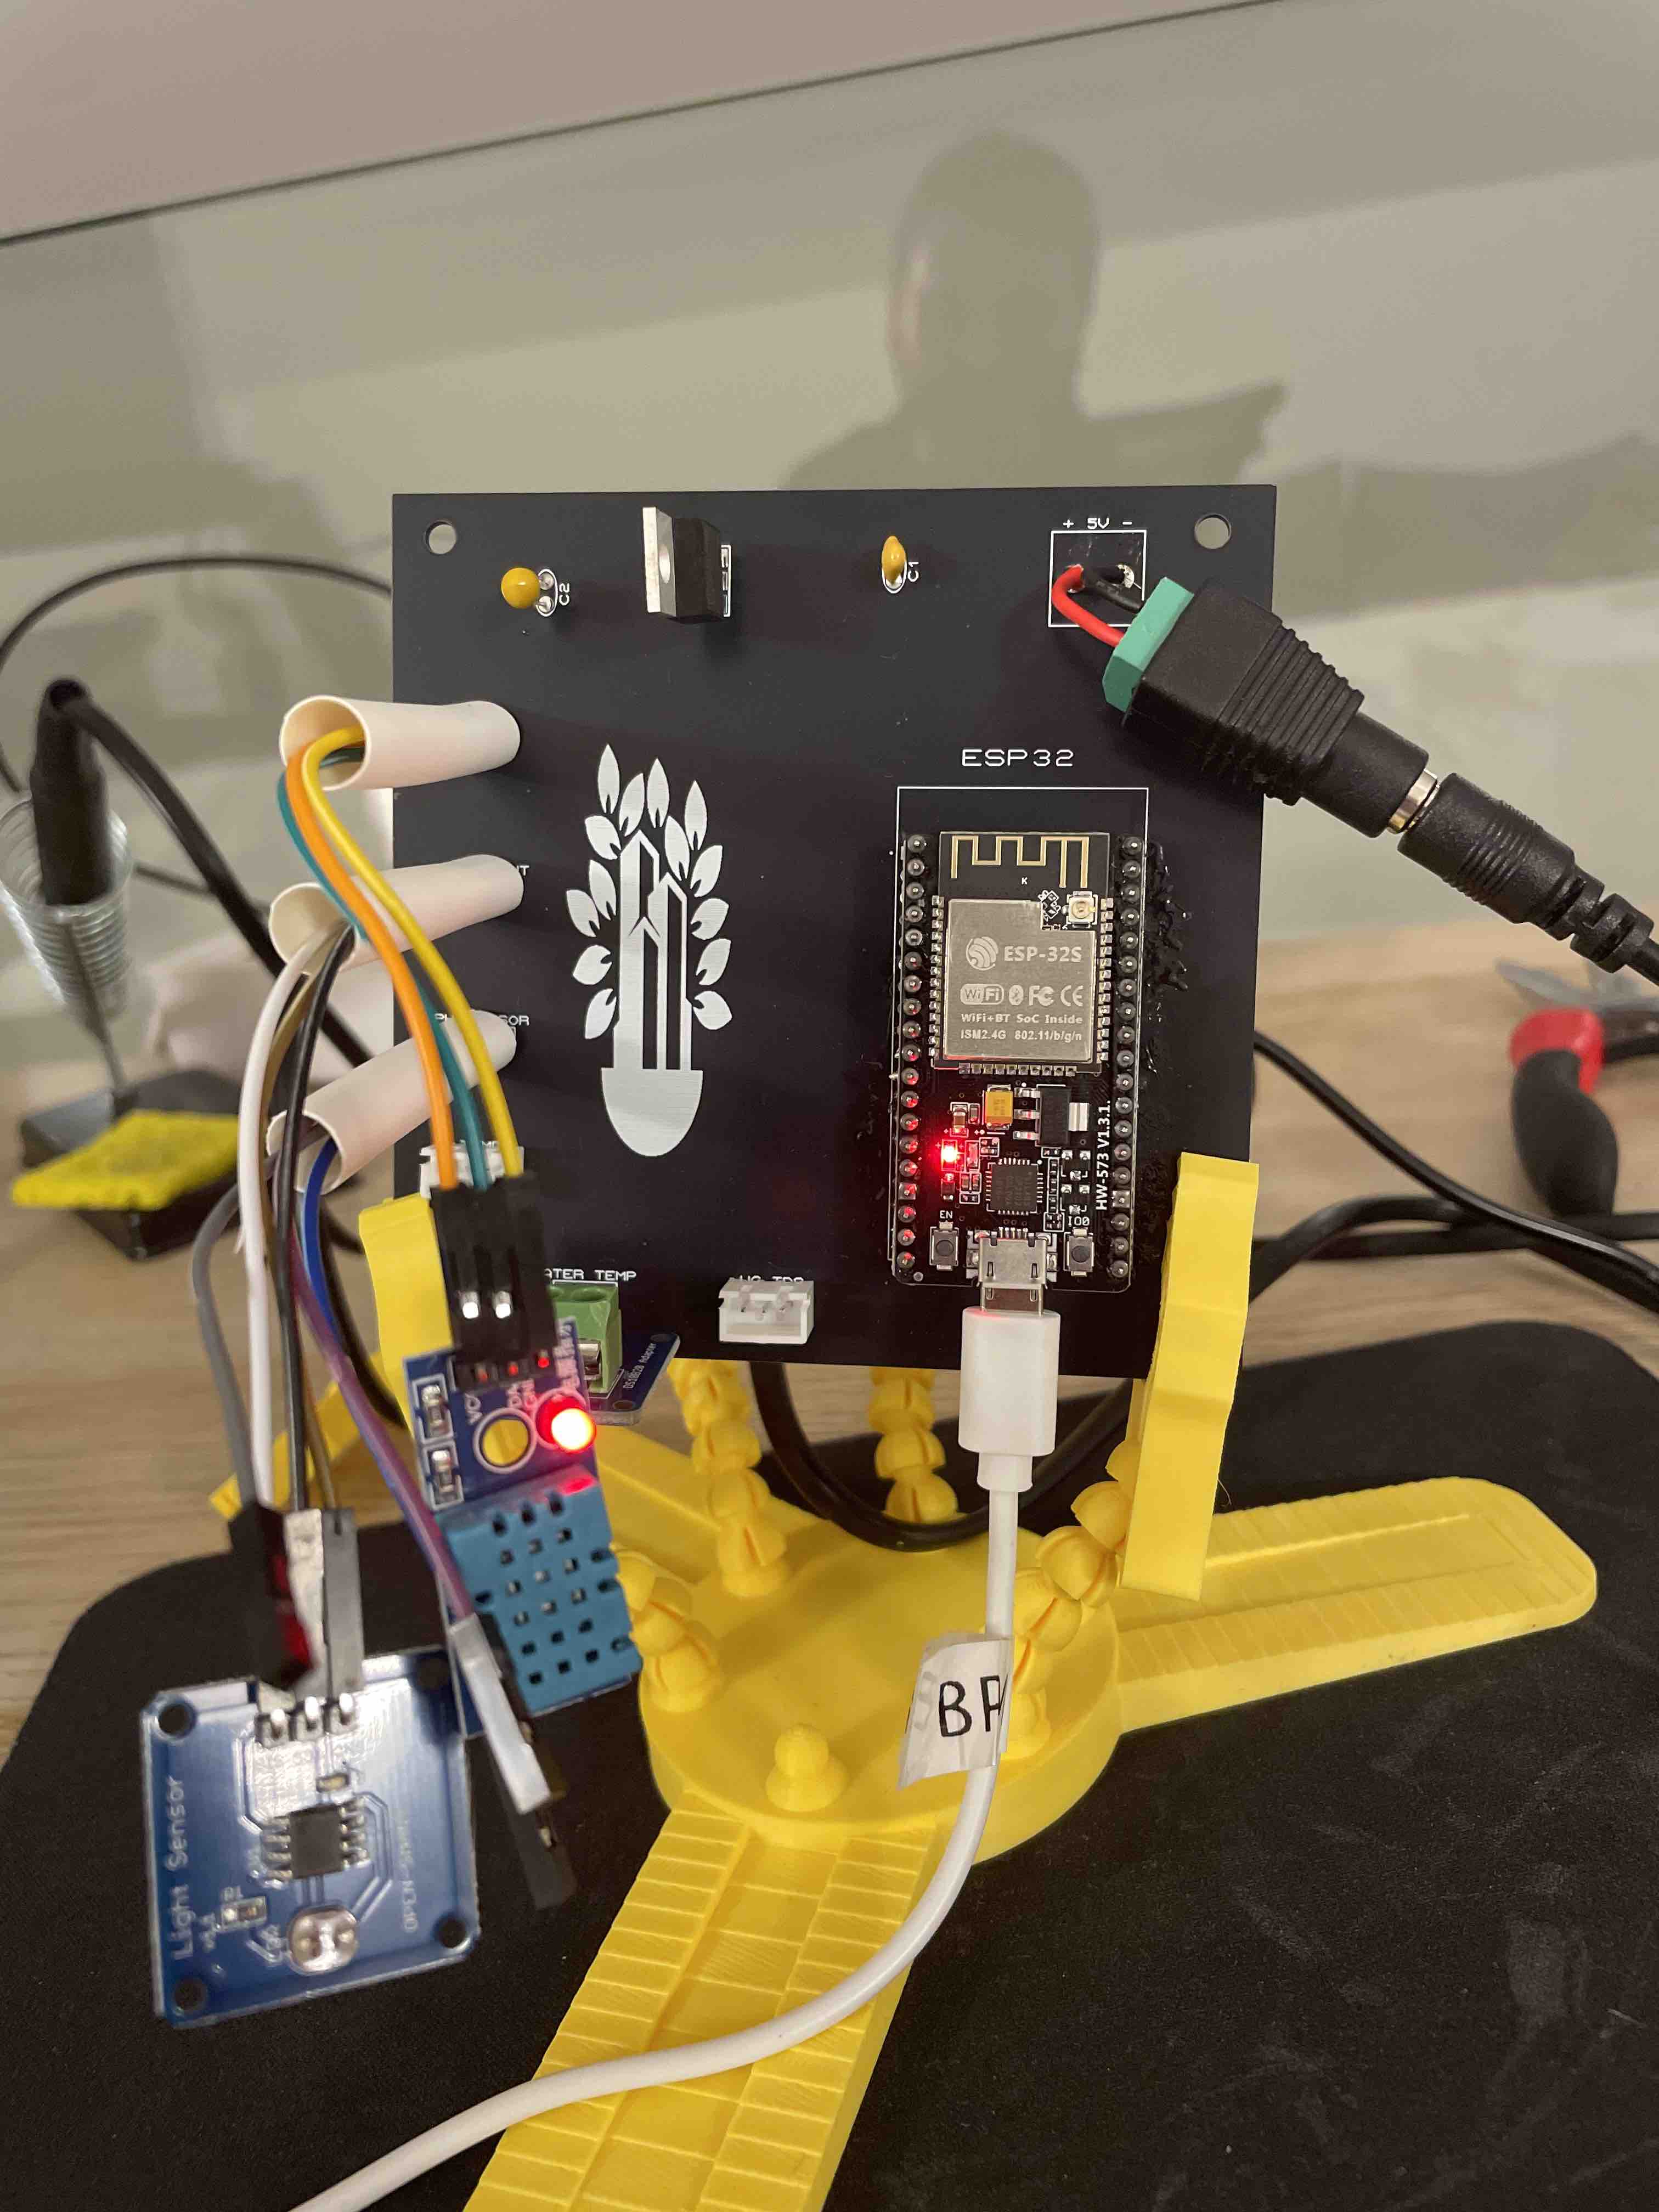
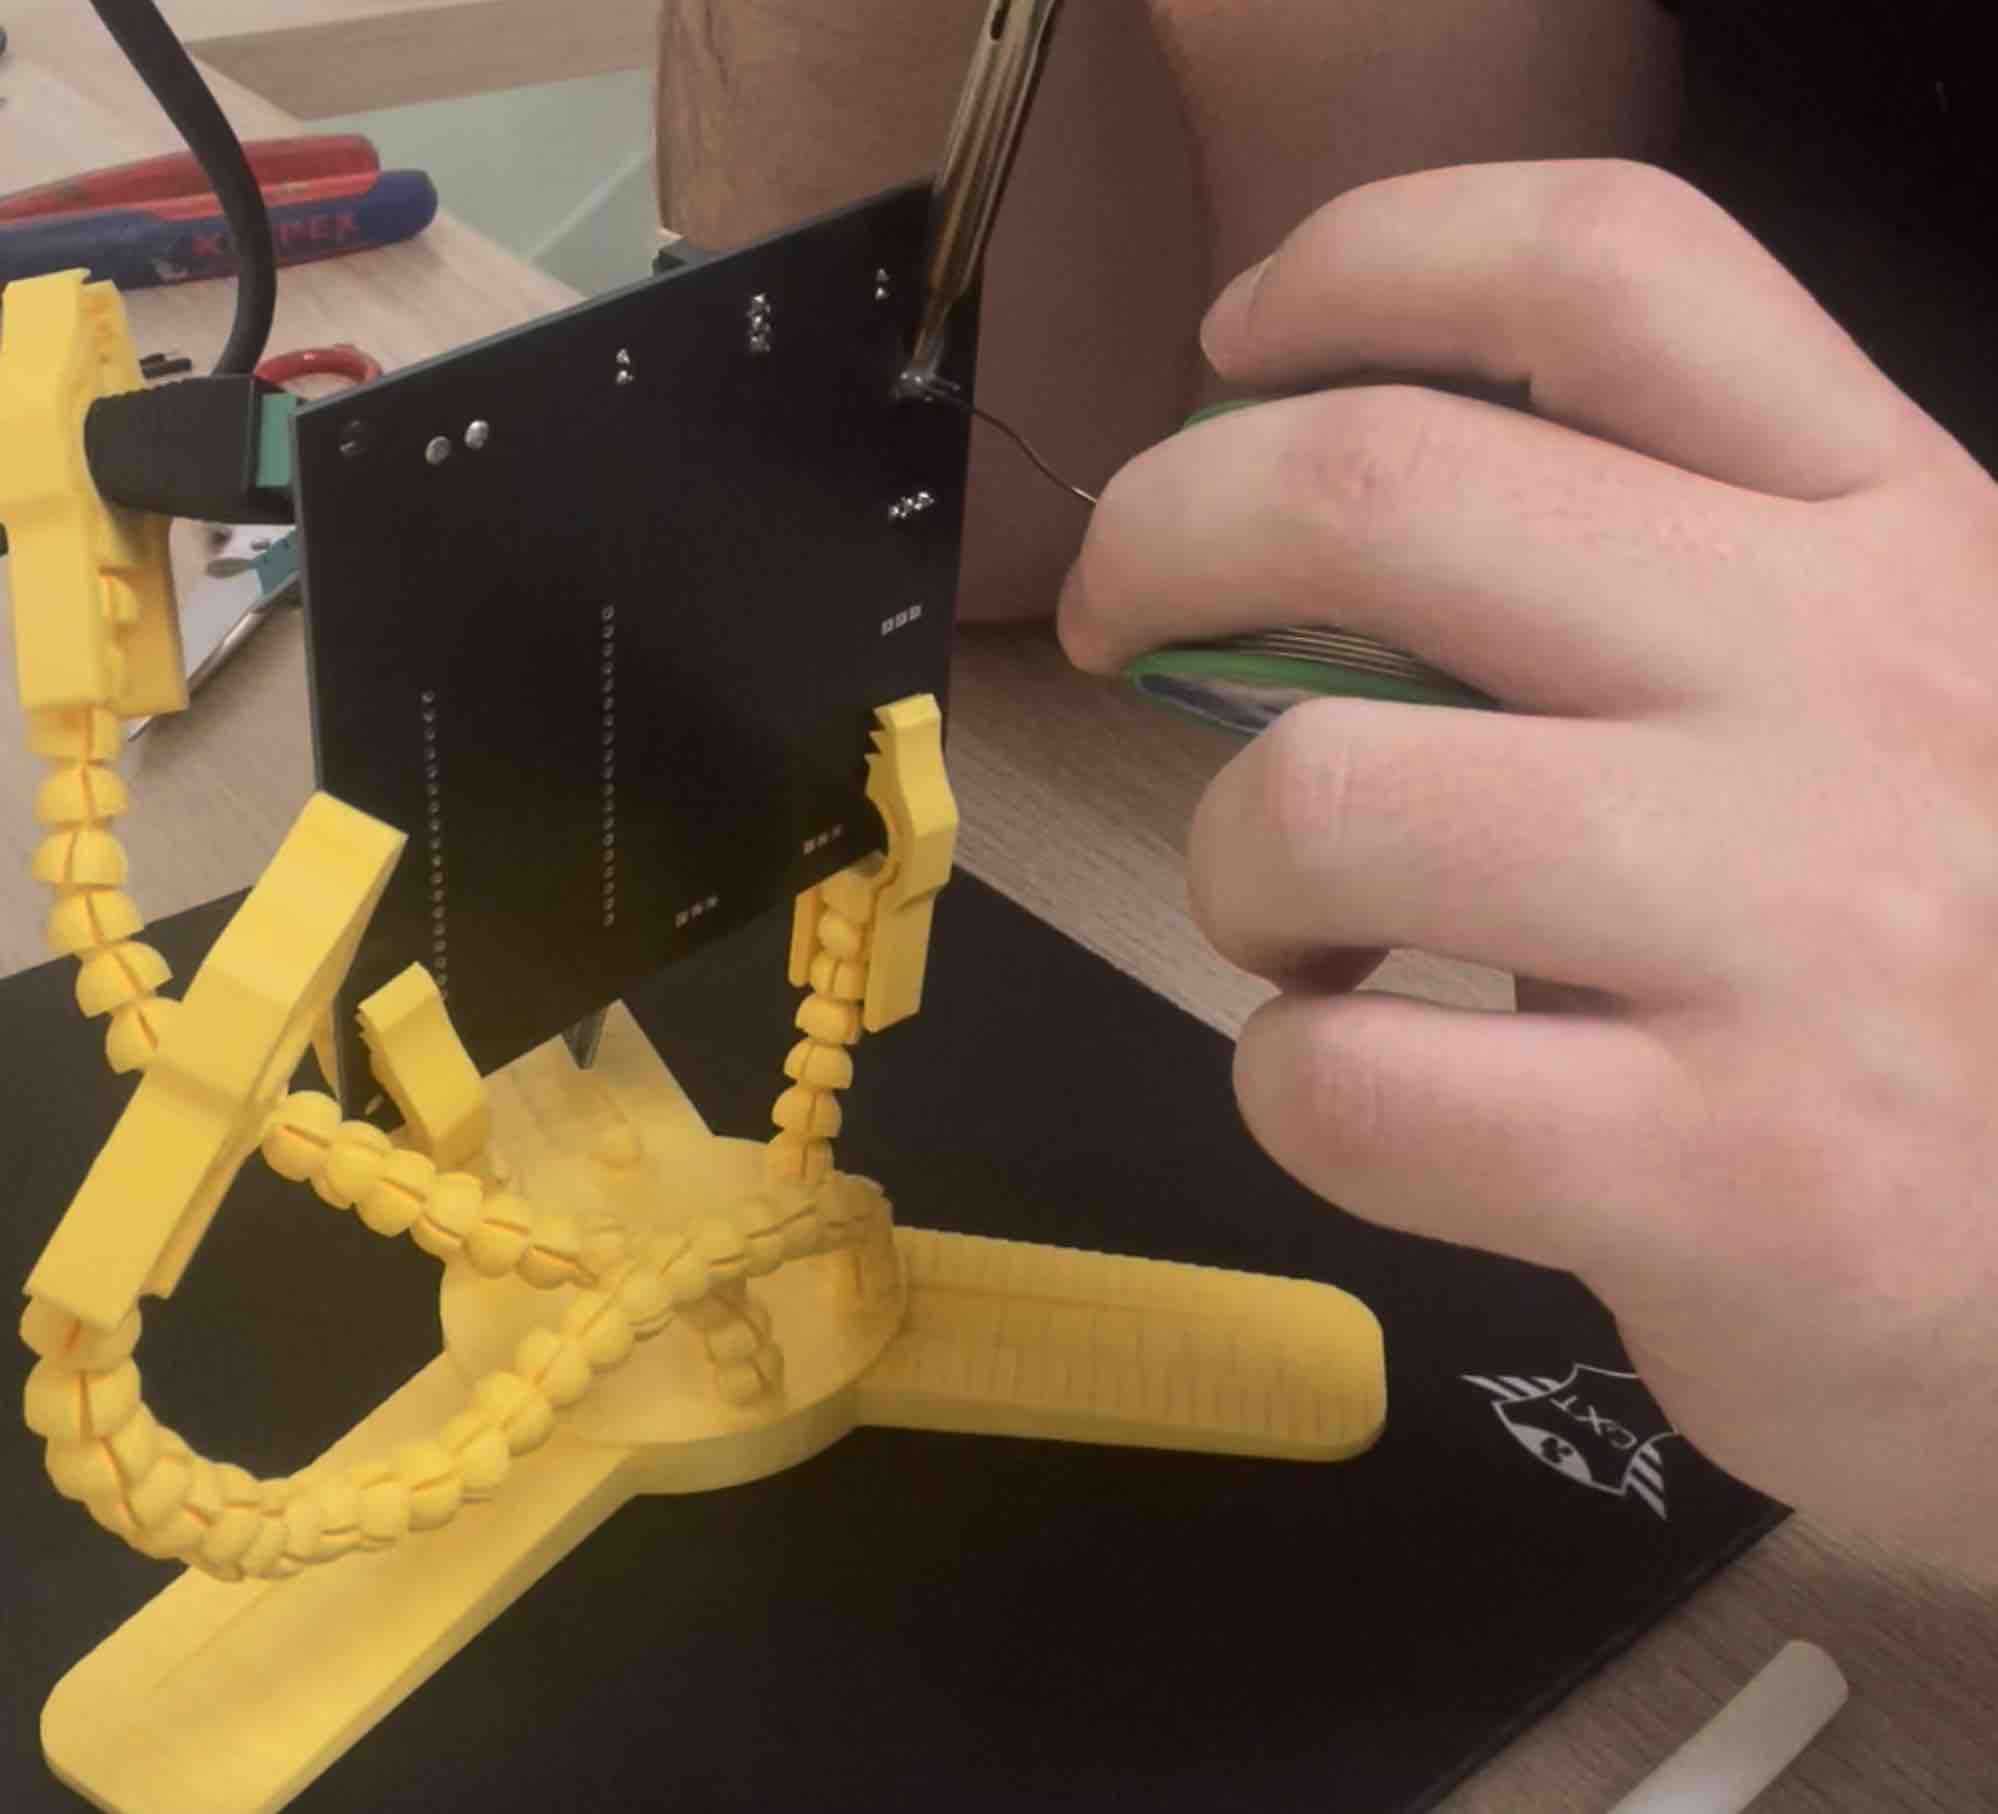
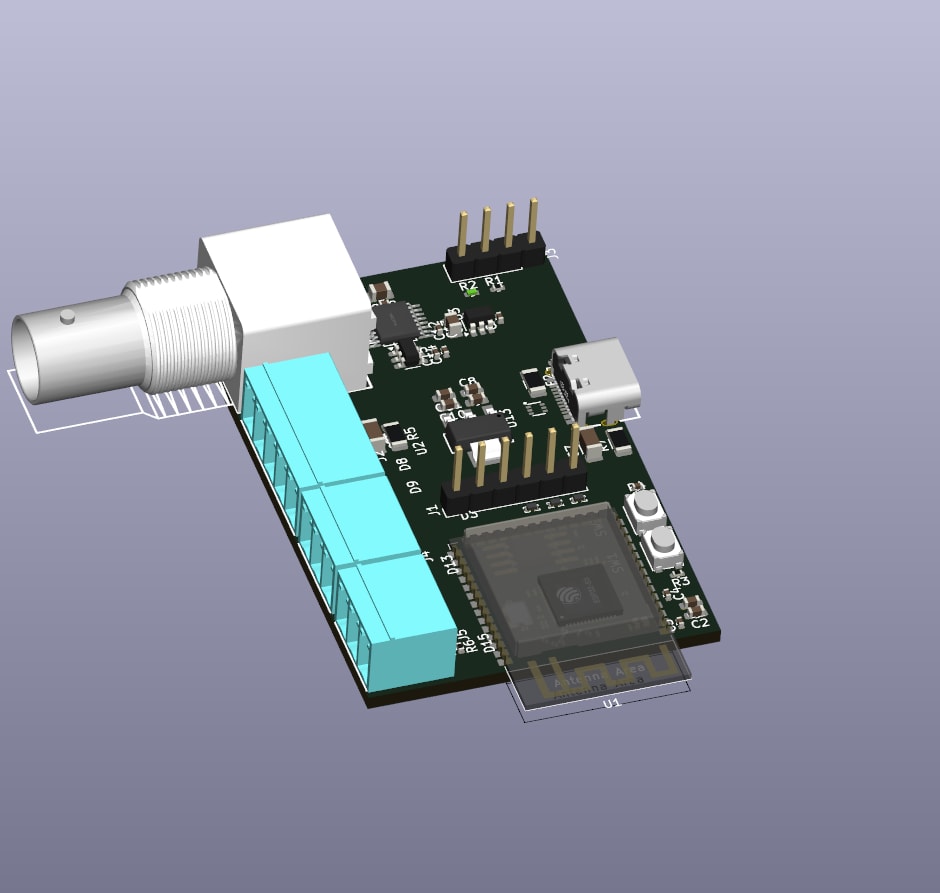
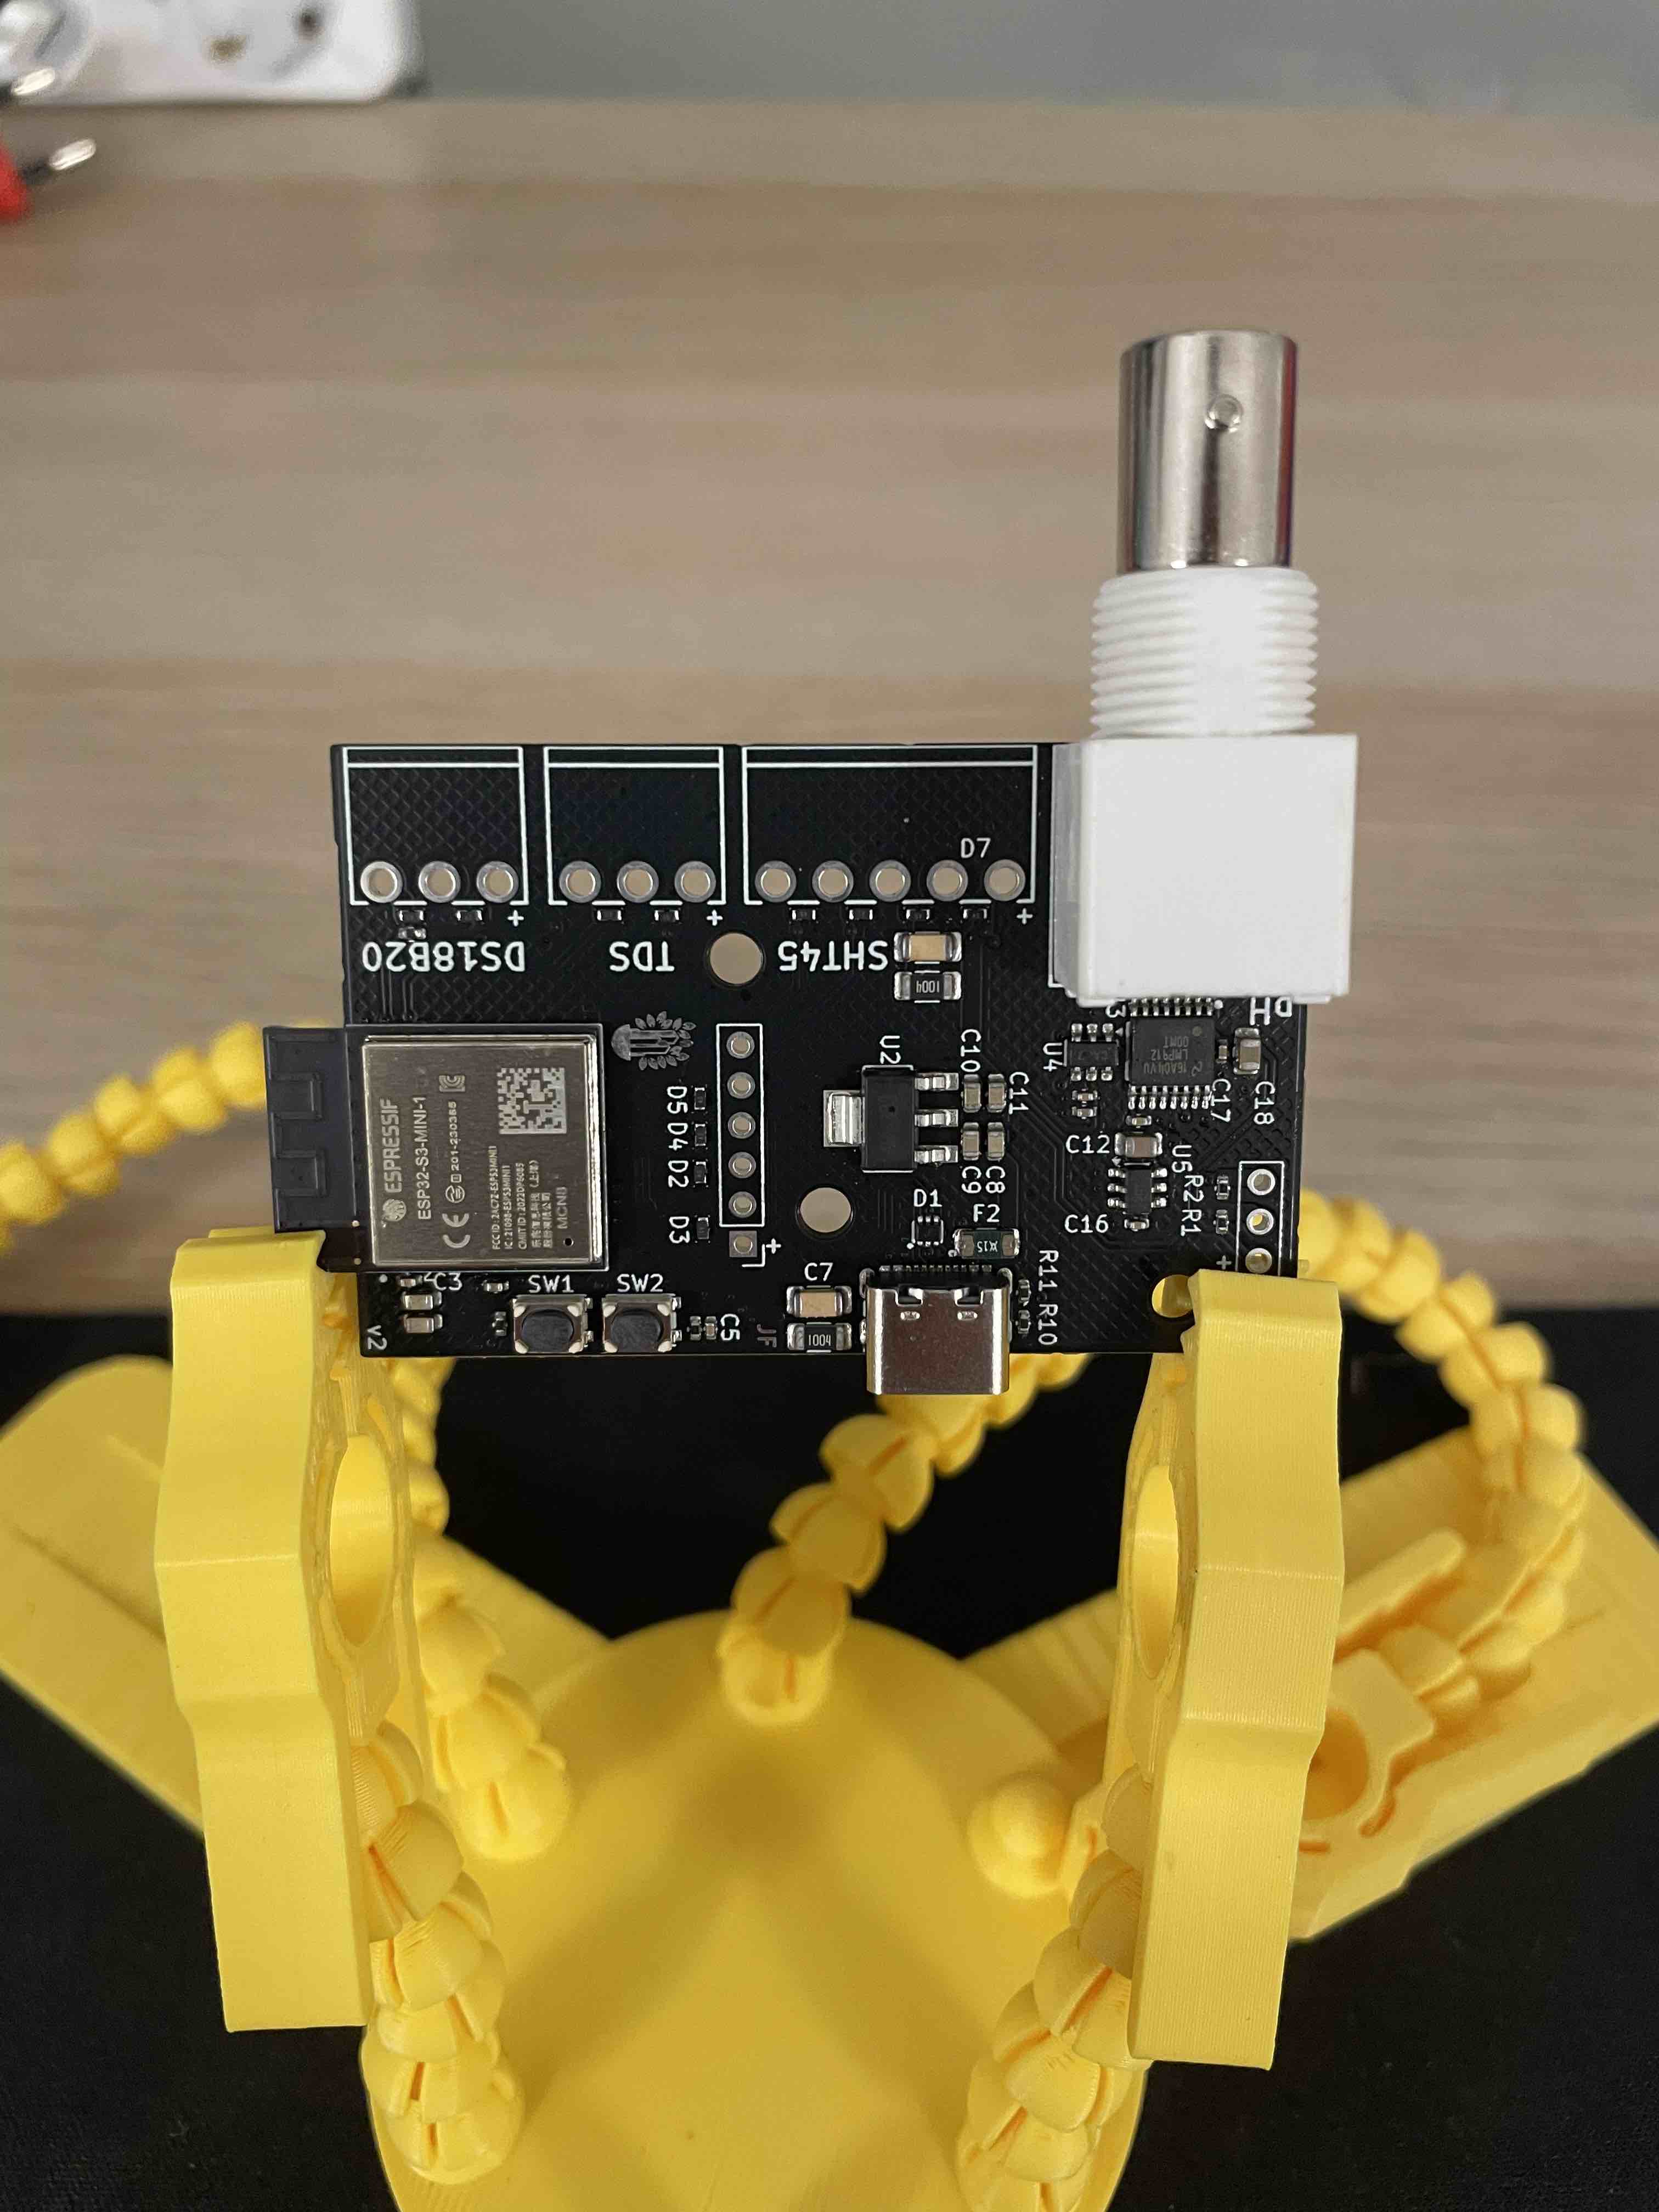
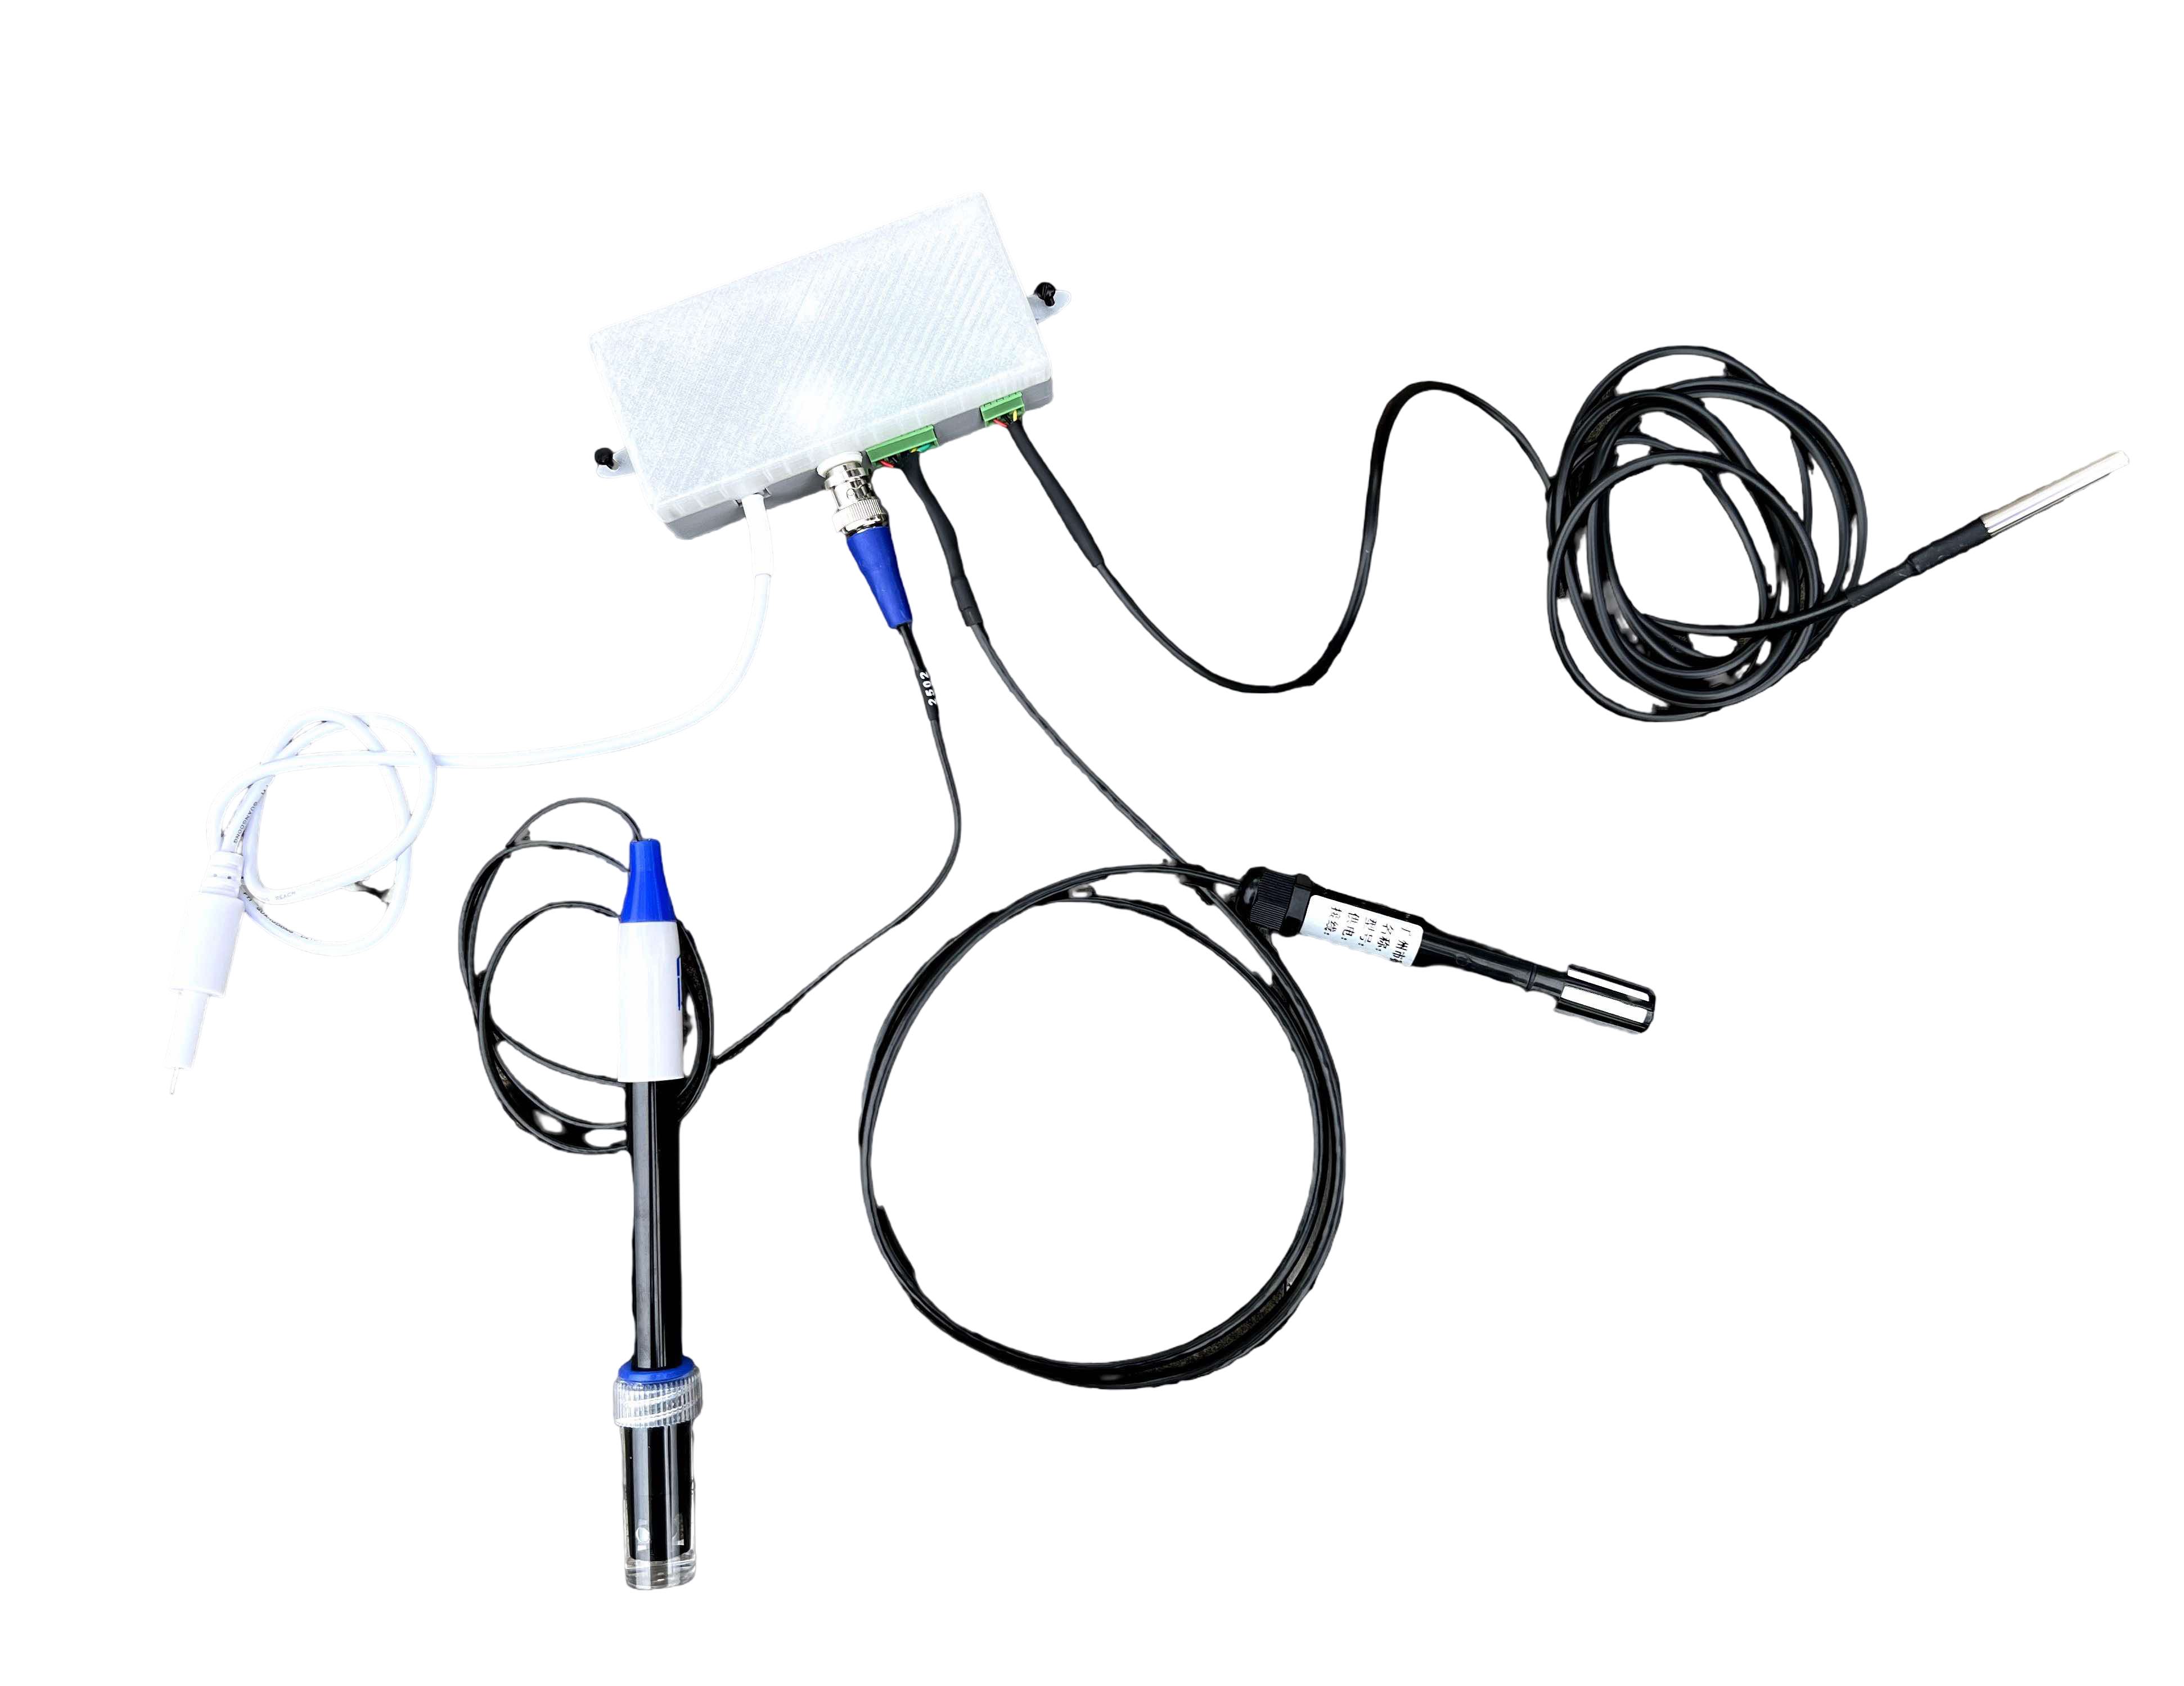
The products are fully assembled, packed, and ready to go, complete with instruction manuals and online support. Looking back at where this all started—with an Arduino and a mess of wires—then progressing to my first custom PCB, and finally arriving at a complete product, it’s been an incredible journey. For all its imperfections, this is a genuine first attempt at entering the market.

Thank you to everyone who has helped me along the way. A huge thank-you to my parents who have helped me out and encouraged me relentlessly, and for patiently listening to me talk about this project non-stop for months, and to all my friends who lent a helping hand—I couldn't have done it without you. 

The project is officially Complete! Stay tuned for the next devices I'll be developing in 2025-2026


Stuck in a paperwork nightmare

May 25, 2025 at 14:27
I've assembled the first 4 RainClouds and have officially received my first pre-order for 4 units! While this is exciting I still can't make the transaction or fulfill the order until I have the CE certificate for my product. Since this is my first time doing this, and I don't have any backing this has become a sort of roadblock for me. Tomorrow I have a meeting with a lawyer in the evening who specializes in these matters. Hopefully he can advise me on the next steps. I think it's time to start making some YouTube videos to advertise the product!  

The kit is complete!

May 15, 2025 at 20:19
After almost six months prototyping (starting with jumper wires and an Arduino), we finally have a production version of the RainCloud hydroponic greenhouse monitor. The pH sensor which was the final hold out is now functional. Though the product itself works and looks great, there is more work to be done now on the paperwork side of things. I need to get a CE certificate before I can sell this anywhere in Europe, and an FCC seal of approval before I can sell this in the US. The case, though functional, needs some design tweaks added to it to accommodate screwing the kit into place. These changes to the case are minor. I am also waiting for the transparent filament to come in so I can print out the transparent top casing. I also need to post the code to GitHub, and finish writing up the instruction manual. All in all, this is still a massive milestone for me as somebody who has never developed hardware before. Its been a pretty well rounded experience doing everything from scratch 

-hardware dev
-software dev
-talking to potential customers 
-writing technical documentation
-filing legal documentation (if we can call CE legal documentation... is that also technical documentation?)

With any luck by the end of May I can release this product as the first Evocultiva product on the store! 

Case design errors... oops

May 2, 2025 at 21:55
I got an initial case design mocked up and printed but of course I didn't account for the cable space for the TDS PCB. It's back to the drawing board. Regardless of if the pcb would have fit or not,  I still want to make some major changes to the design of the case (branding, filament color and type, slot size for the screw terminal cables, vent holes for heat and air exchange, and tabs to use to drill to the wall. 
Case design errors... oops

Adding Data sets and playing with the HA dashboard

May 2, 2025 at 03:15
It's 5 am and I've decided to add a few new calculated metrics to the sensor kit using the existing hardware: EC (from the TDS meter), VPD, absolute humidity, and dew point (from the temperature and humidity sensor). While absolute humidity and dew point aren't essential, I believe there's no such thing as too much data—especially when Home Assistant makes it easy to display only the information that's relevant to you.

I'm also putting the finishing touches on a fully functional pH meter with a calibration feature. I have to say, I'm really happy with how this project is coming together. The entire sensor kit fits into a footprint barely larger than a credit card.

I've also been familiarizing myself with HA dashboards and DuckDNS to put the cherry on top.

Instruction manual and 3d printed case coming soon!

Adding Data sets and playing with the HA dashboard

My Home Assistant Migrates to Raspberry Pi 5 + Progress on pH sensor

April 30, 2025 at 13:32
After hosting HomeAssistant on a virtual machine on my PC, I've decided the project has finally come far enough along to justify getting a raspberry pi 5 to do the work of hosting. The reasons are twofold, first the idea is to host the HA at my farm, so moving a large, expensive, energy intensive PC is not feasible especially for such a small job. Second, it means I can move away from using virtual machines and work on the dedicated HA-OS instead which is more straightforward. 

I 3d printed myself a case for the Raspberry pi that I could screw under my table or to the wall of my shed. I set up HA-OS in under 5 minutes and it worked like a charm on the first try. 

On the software front, I had to write custom C++ for espHome to recognize some of the components related to the pH sensor, but it was worth it. The kit now recognizes the input from my sensor, however I still need to perfect the calibration and data format. as of right now I am getting a return of pH 65 for the glass of tap water on my desk. Needless to say thats far from an ideal reading. Over all I am happy with the progress, getting ESPHOME to read the chip in the first place was a massive challenge, so fixing the calibration should be easy in comparison. 

Programming Progress!

April 11, 2025 at 10:00
Almost there! The TDS, CO2, water temperature, air temperature/humidity, and light sensor are all displaying correctly. The last sensor I need to fix is a tricky one... the pH sensor. Still progress is progress and once the pH sensor is operational it'll be time to set up the 3d printed case!
Programming Progress!

Hitting a bit of a roadblock

April 9, 2025 at 21:04
Well... We've hit  bit of a roadblock. This time I ordered the right screw terminals and I've soldered them in, however I can't seem to get the programming for the sensors right. So far this is where I am at.

The ESP32 successfully links to Home Assistant
All the hardware fits together well

  • CO2 reading is successful 
  • Wifi signal strength is reading successfully 
  • Light intensity reading, successful but doesn't display for user (don't ask me how that's possible)
  • TDS reading but values must be incorrect as they aren't stable (fluctuating 100-900 ppm)
  • Air temp/humidty NULL
  • water temp NULL
  • pH NULL

I will keep trying to fix these issues. Thankfully I don't suspect this to be a hardware issue, it is most likely  just my lack of experience programming for ESPHOME showing. I'll keep you all updated on any progress made. In the meantime I am happy with the way Home Assistant displays the data on the Dashboard. I've attached some pictures of how the data is presented. 


It's back to the soldering!

March 27, 2025 at 22:19
The new prototype has arrived and I'm over the moon. It's a fraction of the size of the original, has far fewer points to solder, and the USB-C connection feels far better than the old barrel jack and micro usb design. It's also far more expensive to produce, however the change in quality is noticeable. 

I've also had a bit of a breakthrough in what I'll do in regards to placing and protecting the light sensor. Instead of placing it externally and designing a case for it as initially planned. I'll be leaving it inside the main case soldered to the main board, and simply print the front of the case in transparent filament. Not only will this allow light to reach the sensor, but it will also show the board in all its glory.  

So far reprogramming it has been a bit of a struggle, for some reason I can't get the system to read the pH meter, and of course I got the wrong sized screw in terminal. On top of that my temperature and humidity sensor still hasn't arrived. These are setbacks I expect to dominate in record time. By the end of May I would like to test a working prototype in my greenhouse.

Until then, it's time to crack on with the trouble shooting. 
It's back to the soldering!

Third PCB prototype

March 16, 2025 at 19:56
These types of advancements in my projects are what bring me joy and keep me going when the going gets tough. Moving away from modular parts and towards embedded parts has allowed us to really reduce the size of the build and shorten production time per unit. The new prototype should arrive soon, I am beyond excited to flash some code onto it and start testing it out. If all goes well, the next step will be to build a case!
Third PCB prototype

One step forward.. two steps back.. three steps forward again!

March 14, 2025 at 23:24
After a few long nights of tinkering and jotting down everything wrong with the prototype..... well let's just say it would be a shorter list to mention what I did right. Thankfully the internet is a big place, and I've recruited the priceless help of a Phd student by the name of Jacopo to help me iron out all the issues.

More importantly, with his help I'll be able to up the quality of the product.

Instead of older DHT22 temperature and humidity sensors, I can implement the superior SHT40.
Instead of the GL528 Light Sensor I now use the  TSL2591, which reads Full-spectrum + IR filtering.

What do these improvements mean for the consumer?

For the temperature and humidity sensor, the benefits are obvious; faster, and more frequent data points, more accuracy, and a water resistant casing meant to survive a farming environment. 

For the light sensor, it opens up a new world of uses and data collection compared to a standard LDR. a typical LDR sensor might only read 5-10,000 lux, however the TSL2591 can read between 0.000188 to 88,000 lux, a vast improvement. On top of that it's capable of reading the infrared spectrum, meaning discerning users can track IR light and see its effects on plant development, temperature regulation, and flowering cycles. In the interest of full disclosure, better steps could be taken towards implementing sensors designed to read the IR spectrum more accurately, however as of the time of development sensors are currently (from what i've found) far too expensive to add to a kit of this cost. 


aside from better sensors, more quality of life work has been done to improve the lifespan and safety of the board.  Implementing electrostatic shock protectors, and implementing pre soldered parts are transforming this kit from a DIY project to a product I can feel proud of selling. 

More updates soon to come. 

Proper PCB prototyping underway

March 11, 2025 at 16:38
Finally the long awaited sensor components have come in. It's time to start soldering and flashing the ESP32 with code I've written while waiting for the sensors to arrive. So far the only component that seems to be giving me any issues is the ESP-32 (go figure). The manufacturer likely sent me a dud as it refuses to go into flash mode, nor do any of my computers even register the device exists (despite having downloaded the drivers). On my end I already messed up by ordering the wrong model, this model ESP32-S has pins 20 mm apart  instead of the commonly sold 25 mm model I planned on using. Thankfully I can get back to troubleshooting and tinkering in the next two days when the new ESP-32's arrive.